Tuesday 30 December 2014

Fried Parmesan Zucchini Slices

One of the many things my husband's family taught me was to prepare and cook vegetables with respect.   My father in law was a market gardener as well as an electrician and he grew a huge diversity of vegetables.


As my own father disliked crumbed food I had never eaten breadcrumbed, fried zucchini until my husband cooked it for me early in our relationship.


We grow zucchini in our garden all year around.  Each plant lasts for about 2 months at which time we start off another 4 plants for a continual supply of flowers to stuff, and zucchinis to enjoy.


Slice the zucchini lengthwise into 5mm slices.
Beat two eggs with 2 tablespoons milk in a bowl. Place 1 cup fresh breadcrumbs mixed with 1/2 cup dried breadcrumbs and 1/3 cup freshly grated parmesan cheese into another bowl.
Dip the zucchini slices into the egg than transfer to the breadcrumbs and coat on each side.
Place onto a plate ready for frying.


Heat a medium size frying pan to medium high heat.
Pour in 1/2 cup vegetable or canola oil and let it heat for 1 minute.
Gently place zucchini slices into the oil, ensure they are not touching.
Fry for 1 - 2 minutes for the first side, gently turn over and fry second side for 1 -2 minutes.
Place onto a paper towel lined platter to drain.
Sprinkle with fine sea salt and freshly cracked black pepper.  


Enjoy alone, or with crusty bread or as a side dish with a main meal.
These can be enjoyed hot but are equally good at room temperature.
If you don't cook them all the readily prepared zucchini slices can be stored in the fridge overnight,
either uncooked ready for frying, or cooked.

~~~~~~~~~~~~~~~~~~~~~~~~~~~~~~~~~~

Fried Parmesan Zucchini Slices 

2 zucchini 
2 eggs
2 tablespoons milk
1 cup fresh breadcrumbs
1/2 cup dried breadcrumbs
1/3 cup parmesan cheese, grated
Vegetable oil for shallow frying
(Vegetable oil keeps the zucchini crisp, olive oil will make them soggy)

Slice the zucchini lengthwise into 5mm slices.
Beat two eggs with 2 tablespoons milk in a bowl. 
Place fresh and dried breadcrumbs with the freshly grated parmesan cheese into another bowl.
Dip the zucchini slices into the egg than transfer to the breadcrumbs and coat on each side.
Place onto a plate ready for frying.

Heat a medium sized frying pan over medium high heat.
Pour in 1/2 cup vegetable or canola oil and let that heat for 1 minute.
Gently place zucchini slices into the oil, ensure they are not touching.
Fry for 1 - 2 minutes for the first side, gently turn over and fry second side for 1 -2 minutes or until lightly golden brown.  Add a little more oil between batches.
Place onto a paper towel lined platter to drain.
Sprinkle with fine sea salt and freshly cracked black pepper.  


Buon appetito, enjoy Merryn xx


Monday 29 December 2014

Edamame so quick to cook

I have heard about Edamame but living in the country and the restaurants we enjoy here and also when away I have never seen it on a menu.
My hubby asked me "what on earth are you growing in this patch of ground?"
I replied "soy beans so I can try Edamame"  which has been popular during the last year.
An old Masterchef contestant, Courtney Roulston was preparing a salad during a recent in-house cooking demonstration in our local hardware store and she had a bag of frozen edamame beans.   Courtney said "You can't buy them  here, but you can get them in Asian grocery stores".  
Yes, this adds to the frustration of shopping in a rural area.


Here is the pretty soy bean plant, with the young pods proudly hanging in groups.

Each soy bean pod was roughly 5cm in length.
I picked them from the plant, rinsed them in a colander.
Bringing water to a rolling boil in a saucepan, I added 1 teaspoon salt.
Then dropped the beans in all at once, put on the lid, turned heat to medium low and
immediately put the timer on for 5 minutes.


After 5 minutes I turned off the heat, and poured the edamame into a colander
and refreshed them by running cold water over the top.


Then I poured them into a pretty bowl and sprinkled them with plenty of freshly ground sea salt.


You eat them by popping the peas out of the pod directly into your mouth.
They have a unique taste, similar to a pea but with more flavour.
It is a satisfying action and very enjoyable.

Will I grow them again?  Definitey as now I know what all of the fuss is about and
I did enjoy these fresh, wholesome Edamame.

Buon appetito, enjoy Merryn xx

Sunday 21 December 2014

Chilli Crab Cooked in 10 minutes with Tomato

In the week before Christmas it has been an amazing time.
We have beautiful Italian friends who invited us for lunch and hubby opened a bottle of 1988 Grange Hermitage on the Thursday, so it could breathe overnight in anticipation of  the Friday lunch.
Hubby has been busy catching crabs and our friends had young ones visiting from northern Italy who had not eaten crabs.
I cooked the crabs, with a mild chilli sauce for these guests, who ate every morsel enthusiastically, taking 2 hours to eat them.


Our hosts had de cantered the beautifully aged 1988 Grange Hermitage and fired up the barbie (barbecue).  They had beautifully marbled scotch fillet from the lush fields of Tamworth and fresh oysters from our local Wallis lake, which were shucked before our eyes and served simply washed in lake water with a squeeze of lime.

I do not take photographs of these events as I live in a small coastal town of 25,000 and everyone really does know everyone, so it is best to keep your movements quiet.

Suffice to say we had an amazing day sipping on the wine with oysters, crusty bread, cheese, fig paste and olives.

The guests kept thanking me for this amazing crab dish, which I had to improvise as our hosts did not have all of the ingredients I usually use with crabs.  (They were even out of garlic.)

It goes to show we can cook anything when we really want to.

~~~~~~~~~~~~~~~~~~~~~~~~~
Improvised Chilli Crab
Serves 2

4 fresh crabs
1 tablespoon grated or bottled ginger
1 long red chillies, seeds removed and finely chopped
1 teaspoon soy sauce
1 teaspoon oyster sauce
1/4 cup water
1/4 cup shaoxing wine
2 teaspoons tamarind puree
1/4 cup white sugar
1 cup bottled tomato puree, or tomato chunks

Remove the top shell from the crab, cut each crab in half and remove gills.  Rinse in cold water.

Place the crabs in a wok, pour in 1 cup of hot water, turn heat to low and put on lid.
Simmer for 5 minutes, do not take off lid.
Then remove wok with oven gloves and pour the water down the sink then return wok to heat.
Turn heat to medium, place ginger and chilli around perimeter, fry for 1 minute.
Add the soy sauce, oyster sauce, water, shaoxing wine, sugar, tamarind puree and tomato, turn crabs over to coat in sauce.  Turn heat to low, put on lid and cook 4 minutes, turning crabs once more.
Take off lid now, turn crabs again.  Total cooking time is 10 minutes.
Pour onto platter and serve.
(Do not heat your platter or the crabs may keep cooking in the sauce.)

Buon appetito, enjoy Merryn

Monday 15 December 2014

The Liebster Award

I am very honoured that the lovely Rachel from rachelskitchennz kindly nominated me for a Liebster Award.  Thank you Rachel, I feel like I am now on the blogging map.


It is interesting reading Rachel's response to questions posed to her and if you choose
to participate in the Liebster Awards you have to;

-->  Answer the 10 questions your nominator asked
-->  Nominate 10 other bloggers with less than 200 followers and
-->  Create 10 questions for your nominees to answer
-->   Notify your nominees that you have selected them for a Liebster Award.

The 10 questions Rachel asked me are;

1.  Sweet or Savoury
Definitely Savoury.
From chilli to eggplant, marguerita to oysters kilpatrick, I love full flavours and drink my espresso and tea black, with no sugar.
I do like cooking though; baking tarts, making sugar laden jams and chocolate brownies - for others.

2.  Beach or Snow
I live in a coastal town.  Full stop.  Warm sunny days with a cool breeze and many beaches nearby for a swim or a walk where the ocean laps on the sand.  Holidays are for yet warmer climates.

3. My most memorable meal.
This is a tough question Rachel.  Was it the beautiful seafood paella I ate on a beach in Fiji or the first time I had gorgeous venison at Benelong Restaurant, or the crocodile I had in Cairns.

These rate highly but my most memorable meal was at a little French restaurant Le Don Batu in Surry Hills, in the 1990's which has now been replaced by a high rise.  I dined there with my husband and had the most beautiful curried whole lobster in it's shell.  This, I will never forget.  The husband/wife team and warm welcome with brilliant French food.

4. A childhood Food Memory
I remember when the first fast food cafe opened in my home town of Gloucester, NSW and we had deep fried chips served wrapped in newspaper.  Those chips were SO good and such a novelty.

5.  Apart from the Essentials what is your favourite piece of kitchen equipment or gadget?
I love my olive pipper.  A stainless steel gadget with a whole in one side and a spike in the other whereby you put the olive in, close and the seed pops out.  You can use it for cherries too.

6.  My favourite novel
Dirt Music by Tim Winton.  A true Australian writing a brilliant novel with an Australian accent.
It reads as though it is a story being told around a campfire.

7.  My favourite cookbook
Stephanie Alexander's The Kitchen Companion.

8. My very favourite ingredient
Chilli.

9.  My least favourite food.
I may be alone here, but it is chocolate.  I had to give it up when breast feeding for the sake of my babies (you mothers know what I mean) and just lost the taste for chocolate.

10. What piece of equipment or gadget do I have in my kitchen that I never use.
The electric doughnut cooker, the fairy floss maker, the electric waffle maker and the breville maker.
I should probably give them to Mum for her Church fete in January.

~~~~~~~~~~~~~~~~~~~~~~~~~~~~~~~~

The 10 bloggers I nominate for a Liebster award
are;


E of Dig in Hobart

Bek of Bek's Backyard

Dani of House in Tillford

Lucy of Lucy Eats

Amy Zhong

Farmer Liz

Rachel and Jamie

Francesca of Almost Italian

Tracy of Sunny Corner Farm

Daphne of Daphne's Dandelions


My 10 questions for you are:
1              Sweet or Savoury?
2              Why did you start blogging?
3              Most memorable meal – where, when and what was the occasion (if you can tell)?
4              A childhood food memory?
5              Apart from the essentials what is your favourite piece of kitchen equipment or gadget?
6              Your favourite novel?
7              Your favourite cookbook or books – if you have more than one?
8              Your favourite ingredient?
9              Your least favourite food?
10           What piece of equipment or gadget do you have in your kitchen that you never use?

This has been fun!  I look forward to reading these Liebster Award recipients responses.

Thanks Rachel xxx

Sunday 14 December 2014

Chipotles Home Smoked

In spring I planted two jalapeno bushes, with the idea of smoking my own chipotles.
Where I live you have to mail order them so I thought it would be very convenient to make my own.

I also grow cayenne peppers, long mild chillies, Thai chillies and birds eye chillies


I picked 850 grams of fresh green jalapenos, weighed them, then washed them and let them air dry.


I cut the stalks off and split some of them open to see if they would dry better when opened.
Then I started the outside smoker, using soaked hickory and apple chips.


There was also a stray purple capsicum added to the shelf.


Maintaining the temperature at a constant 150ºF  (66 ºC).
After 8 hours they were beautifully smoked and quite dry.


I transferred the chipotles to the food dehydrator and turned it on low.


After 8 hours they were perfectly smoked and totally dried.
Success!

Buon appetito, enjoy Merryn xx

Thursday 11 December 2014

Lemon Wine Home Made

At out recent amateur beekeeping Christmas party we were discussing home made wine and liquers.

I congratulated Paula who was my inspiration to make wine last Summer.  Paula had taken along two bottles to last year's Christmas party, offering us each a small glass of her amazingly good home made wine.

"I used champagne yeast to make this one" she said and it was very, very good.

So I reasoned that if Paula, a school teacher, could make wine, so could I.


I mentioned a lemon wine I make and offered to send her the recipe, which she happily accepted, so I thought I should share it with you.   Anyone can make this and the ingredients are easy to source.

Paula also makes mead with her wine and I am looking forward to her gifting this recipe to me ....  it only takes six months to mature, so that will be interesting. (Having never tasted mead I don't even know if I will like it).  We have raw organic honey, the essential ingredient and three young men living here to taste test. 


Note the bubbles!
This measures 10% alchohol.

~~~~~~~~~~~~~~~~~~~~~~~~~~~~~~~~~
Lemon Wine Recipe

This should be bottled in screw topped containers so that the fizz can be controlled when the bottles are opened.  If it is too fizzy you can reduce the quantity of raisins.

6 - 8 lemons, depending on size, preferably organic
1 cup raisins
2 kg sugar
1 litre boiling water
15 litres cold water

Wash and let the lemons dry.  Slice the lemons into a large container, add the raisins and sugar then stir in the boiling water.  When the sugar is dissolved add the cold water and mix well.  Cover and leave 4 days.  Strain, bottle and cap.  Leave 1 - 2 weeks before using and chill before opening.
Open bottles carefully.


~~~~~~~~~~~~~~~~~~~~~~~~~~~~~~~~

Buon appetito, enjoy Merryn xx

Monday 8 December 2014

Cannellini Beans with spinach, garlic and spring onions

It was Saturday night, a peaceful, warm and relaxed summer evening.
The New York steaks were resting at room temperature, the red/white quinoa salad was prepared, eggs boiled, wine opened and potatoes peeled and sliced ready for a quick frying.
From outside came the contented purr of the lawn mower, then suddenly hubby came bursting through the front door screaming "ah the bugg_rs are stinging me" as he raced towards the bathroom.

I could still hear the lawn mower purring away ...


A few minutes later he emerged and said two bees had stung him on the leg while another had stung him on his eyebrow.  Full of sympathy (as I know how much it hurts on your head) I offered the sting-ose, a steroid pill, anithistamine and aspirin knowing these would help him.

He went to lay down and I knew the barbecued steaks would not now eventuate ...

So I changed course and seasoned the steaks to cook inside on the teppan and made this hasty cannellini dish as another healthy side.

~~~~~~~~~~~~~~~~~~~~

Cannellini beans with spinach, garlic and spring onions.

Serves 4 - 6 as a side dish

1/4 cup olive oil
400g can cooked cannellini beans, drained   (butter beans or chick peas)
1 large garlic clove, finely chopped
1 red chilli, chopped, optional
1/2 bunch fresh spinach, (4 big leaves) washed and chopped
4 shallots, sliced


Heat a small frypan with the olive oil, swirl and add garlic plus chilli (if using) to fry for one minute over medium heat.
Add spinach and beans, toss to combine and cook for three minutes or until the spinach wilts.
Add the shallots, season with salt and pepper and fry for another three minutes.
Remove from heat and serve warm.

~~~~~~~~~~~~~~~~~~~~

(P.S.After resting for an hour, hubby's eyebrow was swollen from the bee venom and his jaw ached so much he only had two bananas for dinner.)

This is my speedy go-to vegetable offering, I would love to know what speedy dish you cook at these times and do you swell when stung by a bee?

Buon appetito, enjoy, Merryn xo


Tuesday 2 December 2014

Garden Share Collective December 2014


Precious blackberries, this variety is thornless.  We have two patches, one is in an old rusty wheelbarrow and the other is in a dedicated bed.
Blackberries remind me of happy childhood days when we would pick the ones growing wild nearby, they had many thorns and my mother would make blackberry pie and delicious blackberry jam.
~~~~~~~~~~~~~~~~~~
As I wandered around the garden yesterday taking photographs for this month's Garden Share Collective hosted by Lizzie I was impressed by how many different vegetables and fruits were growing.  It is also fascinating looking at what is growing in the other  Garden Share Collective member's gardens.  
From artichokes to zucchinis, December summer gardening is diverse.


Finally I am growing Australian organic garlic successfully.


The above plants are soy beans.  
The young pods are known as edamame and they will be ready to start picking this weekend.


We have crisp green stingless beans (my favourite), Italian beans and purple beans.
They are so easy to grow over the warmer months.  Just give them a little support to grow on.


Fruit fly traps.  A must in our summer garden.  Every day there are at least two fruit flys in each trap.


Cucumbers rambling across the ground.  The essential salad ingredient.


These tomatoes are from a strain grown by my father-in-law.
They are large, sweet, juicy yet firm.  


Zucchinis are great from the battered flowers to the whole vegetable cooked in so many ways. 
Maintenance and pest free, they simply produce continually for a couple of months. 


My asparagus patch which I was so proud of last year, was neglected through winter.
There are only a few sparse asparagus stems so hubby planted zucchini and tomatoes over the top.
I have bought more crowns and plants to plant out when these crops have finished.


 Strawberries are abundant these will flower until winter producing luscious, juicy strawberries.
These are enjoyed by adults and children alike.


I picked the first eggplant last weekend, from start to finish they only seem to take two weeks
before each fruit can be picked, cooked and enjoyed.


Jalapenos, luscious and bursting with flavour and heat.
Last year the chickens ate all of my plants, but not this year.
I am going to smoke some to see if I can produce an authentic chipotle flavour.


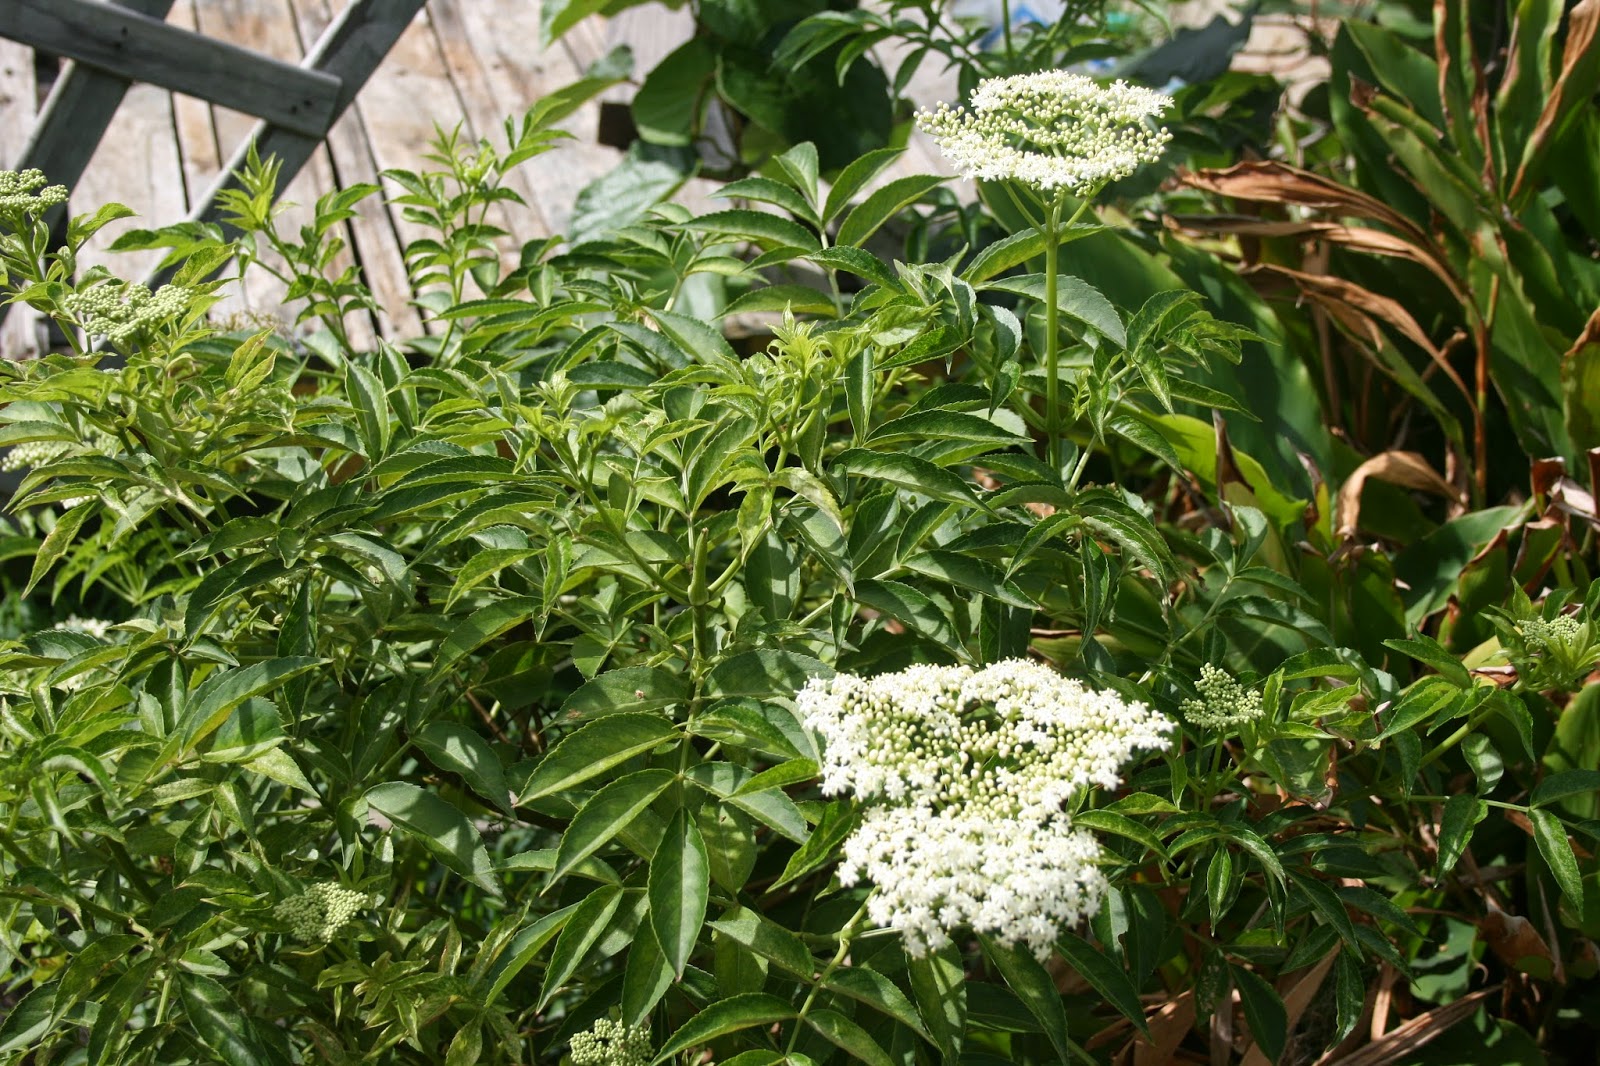
This Elderflower Tree is a delightful addition to the garden.
It is pretty, flowers continually over summer, is great for the bees
and delicious in teas as well as cordials.


Never ending spinach as it grows all year around and is great for chickens and people.
Our feathered girls love a few leaves, they eat all of the stalks as well.

This banana bunch is turning a paler shade of green and slightly flushed with hints of pale lemon.
This has attracted the attention of a pair of King Parrots who like to sit on top of the bunch and eat, hence the netting.


The King Parrots also like to nibble on the corn ears.
It is best to grow enough for yourself and the birds.


A Pomegranate tree is a beautiful sight.
The fruit starts as small red flowers which develop into moist, juicy fruit.


We still have peaches ripening.


My little cinnamon tree survived the winter, it is evergreen.
It is slowly but surely, growing.
Cinnamon quills possibly in 18 months time.

Now that you have seen the highlights of my December garden please browse the other 

Buon appetito, enjoy Merryn xx


Friday 28 November 2014

Home Made Wine Making

It is with pleasure I report how good the wine I made at Christmas is to drink after 9 months of aging.

Last Christmas we had a lot of grapes ripen.  We ate them fresh, I made jam (mainly for my parents), protected them with netting from the birds and still ate more.  There were kilos and kilos of the gorgeous, plump grapes, far too many to consume by eating alone.

As it was my Christmas break - 3 1/2 weeks of glorious sunny holidays  I decided to make wine.


After doing research from existing cookbooks and online research I went to buy essential equipment.
It was New Years Day and nearly every store was closed so we took a day trip to Port Macquarie and bought goodies including plastic 'vats', airlocks, yeast, hydrometer and steriliser.


It was impossible to buy a grape press so I improvised and purchased two large colanders and a strong masher to squash the juice from the grapes.  It took muscles and a lot of effort to obtain the precious grape juice.  My mother, husband and teenagers helped to squash the grapes
(yes naturally our Italian friends asked if we had washed our feet first).

Then I suspended the skins and seeds in muslin to extract every last drop of grape juice 
(or grape must by which it is known).
Then I weighed the juice and placed the grape must into sterilised vats
using a hydrometer to test for acidity.

Luckily I WROTE DOWN EVERY DETAIL for future reference.

Warning:  My diary is quite lengthy. 

Day 1 Pressed 7kg mixed white/pink & red grapes,  7 litres of must
Placed into vat and added 1/4 teaspoon metabisulfite, stirred and covered with a tea towel tied on by a rubber band.

Day 4 8am   Tested with hydrometer, at 1060 acid is 5% (should be 3.8%) so I added 2 cups white sugar, stirred and put tea towel back on top.   at 9pm hydrometer reading 1080 (perfect!)  Acidity however was raised to 6%

Day 5 Added 2 litres cooled boiled water and another 1/4 teaspoon metabisulfite.


Day 6 Hydrometer 1060 acidity 5% so I added 1 1/2cups sugar and 1.5 litres water.

Day 8 Hydrometer 1070 Acidity 4.1% I then added 500ml water and 1/2 cup sugar.
2 hours later Hydrometer 1070 Acid 5% then added 1 cup sugar
2 hours later  Added 700ml water
4 hours later Hydrometer read 1075 Acidity was 5%
at 9pm I added 2 teaspoons citric acid
Day 9 Hydrometer 1075Acidity 6.2% which meant I added 2 tspns cream of tartar and 1/2 cup sugar
Yeast is added!  4g white wine yeast stirred into mixture then I put on the airlock.


I am definitely learning quickly on this journey and having fun with this project. 

By midday the mixture is bubbling away.                                
There is a bubble every 1.2 seconds in the airlock, this is exciting. 
After 3 days the bubbling has stopped so I open the vat and taste to find the flavour is quite bitter.      I added 1  1/2 litres of cooled boiled water and 500g sugar.
It rested for one week then I added 2 litres more of fresh grape must with 1/4 tspn of metabisulfite.
2 days later which meant it is now;

Day 19 I added 1 cup sugar and 4g dried wine yeast.
I put the airlock back on and after 3 days I added 1kg sugar, putting the airlock back on.

Now, on Day 27 IT IS READY FOR BOTTLING.


I had saved glass wine bottles for months and bought 4 litre glass flagons as well.
They were washed in hot soapy water, rinsed and sterilised with the sterilising solution.

From this batch I bottled an impressive 14 litres of WINE
with 10% alcohol content and 7% acidity.

At this time the wine tastes okay, it is neither sweet nor sour, it just tastes pleasant.


Even my non-drinking parents were impressed,  I was ecstatic!

On the long weekend in June we tried a bottle but it was not very nice, I thought I had made a lot of vinegar.  Then on the long weekend in October, 9 months later, I tried the wine again and was pleasantly surprised that it was not only drinkable, it was actually very lovely and refreshing.

This year, I have purchased a stainless steel wine press to squash the grapes.  Bring on the grapes!

Buon appetito, I hope you have enjoyed this wine making tutorial.
Enjoy, Merryn.


Wednesday 19 November 2014

Home made Cough Syrup that actually tastes good.

Friends were visiting the other day and I offered the gentleman a glass of water as his coca cola was finished.  "No thanks" he said, "I don't drink water, water rusts you from the inside".  

I don't think I will ever forget this quote Trevor.

Dylan has had a cough for two weeks, one of those nagging, dry coughs that hang around forever.
He doesn't like the traditional cough lozenges so I made a bottle of simple,  home made cough syrup from ingredients in the cupboard.

I have to share this recipe as it works and  is easy to drink as it tastes good.

I thank Wellness Mama for her suggestion.


Make it and store in the refrigerator for up to two months, if it lasts that long.


Note the scribbly hand writing as a last minute thought, before I planned to share it here.

Home Made Cough Syrup
1 litre of filtered water (I used rainwater)
1/2 cup chopped fresh ginger
1/4 cup dried chamomile flowers
1/4 cup dried marshmallow root
1 tablespoon cinnamon
1/4 cup lemon juice
1 cup honey

Put the ginger and herbs into a medium saucepan and add the water.
Bring to a boil and reduce to a simmer.  Simmer until the quantity is reduced to half.  
Pour through muslin or cheesecloth to strain the herbs out, discard the herbs.
While the liquid is still warm mix with the freshly squeezed lemon juice and honey.
Mix well.  Store into a sterilised air tight container, label and keep in fridge for up to 2 months.
Give 1 teaspoon to children and 1 tablespoon to adults as needed for symptoms.

(Dylan is having a medicine cup full per time, it is really helping his cough and sleeping.)

Bon appetito, enjoy, Merryn xx


Monday 10 November 2014

Bottarga Made at Home


Home Made Bottarga from freshly caught fish

Thanks to a sweet friend who gave us flathead fillets, especially the sweet tails.
He also generously gave us some fresh, whole flathead fish roe.
I have been keen to get my hands on some roe to make Bottarga - a salted, preserved fish roe.
This is prevalent in Sardinia and specific Italian coastal communities 
make Bottarga as their own specialty product.


Bottarga is salted, cured fish roe and it is traditionally finely sliced or crumbled onto pasta.
   Try sprinkling some crumbled Bottarga onto Aglio e olio (garlic and oil spaghettini).
  It can also be added over bean or asparagus dishes for an intense addition of flavour.


1.  Gently wash and then place the fish roe sacs into salted water and leave overnight.


2.  Next day:
Drain the fish roe on absorbent paper, blotting dry very gently, you don't want to break the sacs.


3.  Gently coat the sacs in a little olive oil, turning to coat them completely.


4.  Roll in pure coarse sea salt and place on fresh, absorbent paper.


5.  Cover all of the sacs with fine sea salt, making sure they do not touch each other.


Cover with muslin to keep any bugs away.
All you can see is a salt filled bowl.


6.  Check after four days, you may need to change the absorbent paper and add more fine sea salt.
 Here I additionally used an anti-insect cover to protect the bottarga.


On day 7 check the bottarga again to see if paper needs replacing and to ensure they are salt coated.

7.  After fourteen days here is the completed project.
It is cured after ten days but it doesn't hurt to leave it a bit longer.

Remove the bottarga from most of the salt, a little salt will still cling to them.
To store, vacuum seal or place in a glass jar in the fridge or store in freezer for up to one year.
When a piece of bottarga is sliced or ground the rest will lose flavour quickly so use all of the piece.
Try it over pasta and please, tell me what you think of the intense flavour.

Bon appetito, Enjoy Merryn xx