Monday, 30 June 2014

Apricot Danish with Custard - a simple version

I clearly remember the first rock concert that I ever saw, it was Robert Plant supported by Jimmy Page on lead guitar at the Sydney Entertainment Centre.

As a teenager freshly moved to the city the excitement was enormous and it was a huge event.
I was so excited I just wanted to get on the train into the city and not bother with dinner, so my friends and I stopped at a bakery on Bondi Road and bought various pastries to eat on the train.
I chose an apricot danish - my very first bites of this delight.  It didn't quite look like this one, and had a cream cheese filling but it was still the start of a love affair!

Needless to say Robert Plant was fantastic, performing largely Led Zeppelin songs and the crescendo of Stairway to Heaven was phenomenal.   The adrenalin of the performers and the audience was electric.


There are some things in life you just look at and decide you can do too. I was determined to make danish. I have been making apricot danishes periodically since then and Led Zeppelin are still great listening.

This is my super quick adapted recipe, perfect for everyone.

# Take 4 sheets of ready made puff pastry out of the freezer and place on their plastic sheets, on your bench.
Turn on an old Led Zeppelin album, to create the mood.
# Make 2 cups custard, you can create an egg custard or even a packet mix will do for this recipe.  Let cool.
# Open a 800gram can of apricot halves and drain in a colander.
# Beat one egg yolk with one tablespoon milk for egg wash.
# 2 tablespoons apricot jam warmed, for glazing after cooked.
#  Lightly butter two baking trays.
#  Heat oven to 200 Celsius.


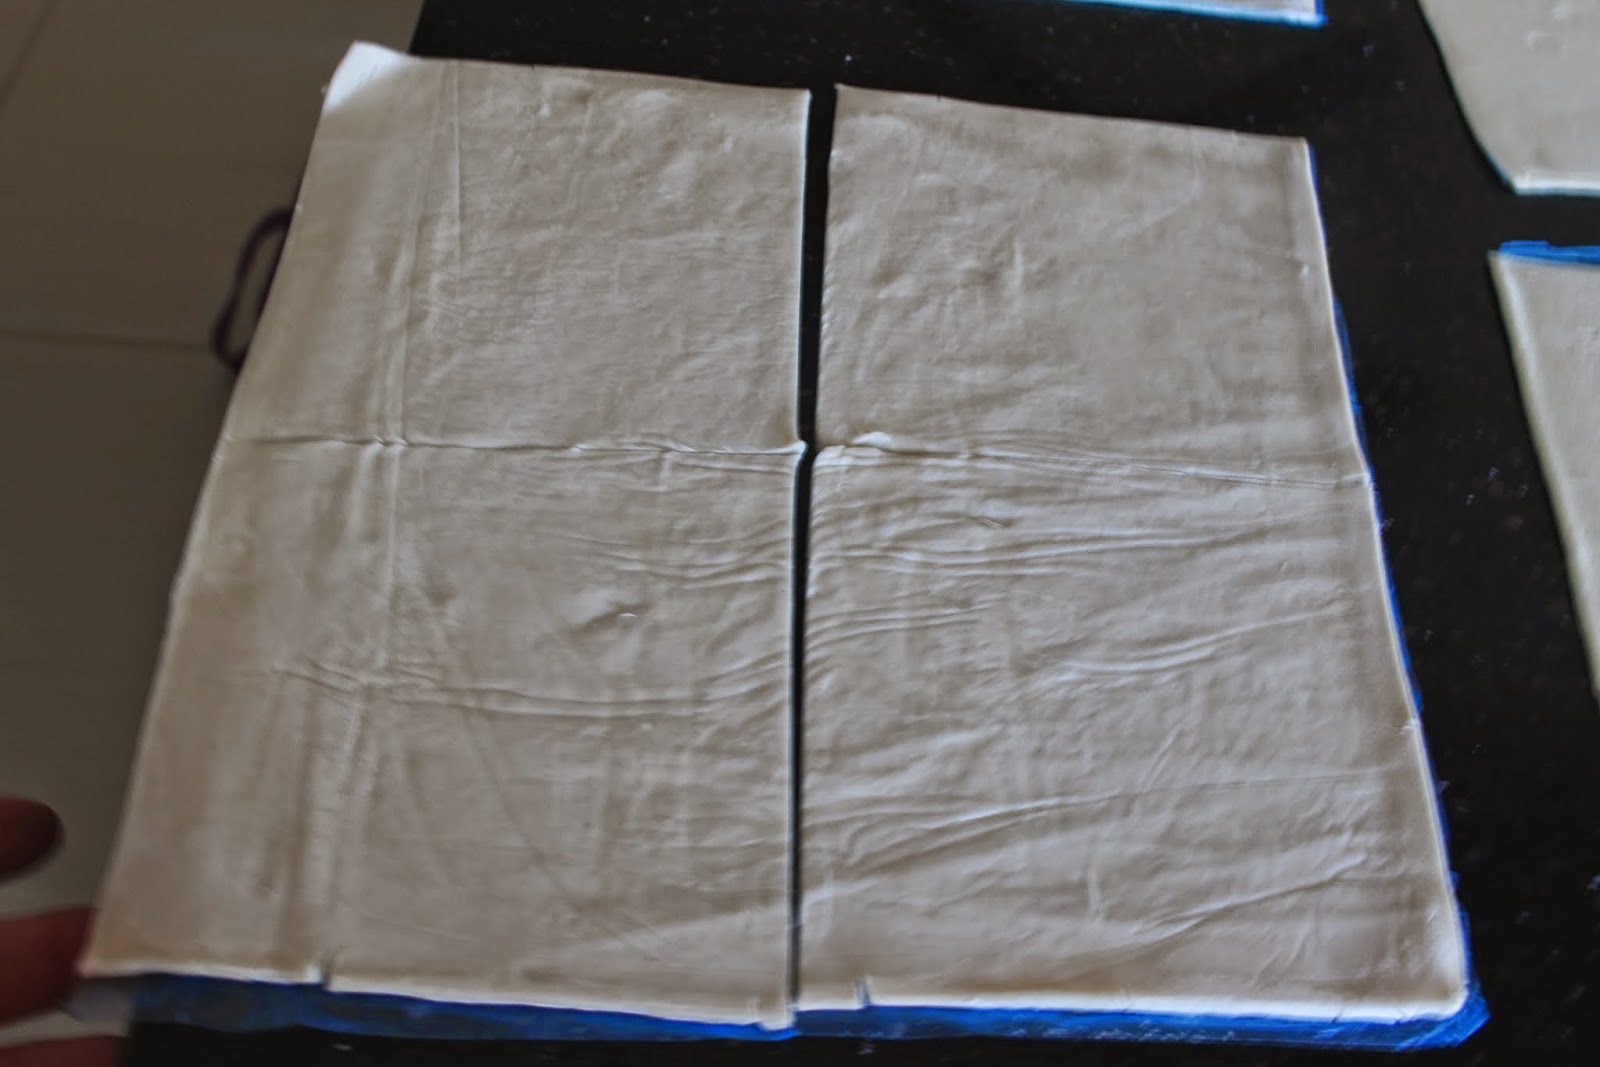
Cut the sheets of puff pastry, when defrosted, into four quarters.
Place a big tablespoon of custard into 2 corners of the pastry, as shown.


Place an upturned apricot half on top of the custard.


Fold over one side and lightly press to keep it's shape, as shown below.


Then turn the other side over on top of your first layer, lightly pressing to seal.
Carefully remove from plastic and place onto buttered baking tray.


Brush the egg wash on top of the apricot danishes.
Sprinkle the middle of each one with a little white sugar.


Bake at 200 celsius for approx 30 minutes, turning heat down to 190 celsius if browning too quickly.
Rotate your trays every 10 minutes.


Remove from oven, place onto cooling rack and brush the middle lightly with apricot jam.

Buon appetito, enjoy Merryn.

If you enjoyed this post, please leave me a comment, I love reading them and will always respond.


Wednesday, 25 June 2014

Merryn's Menu: Saint Fanourios Cake

Merryn's Menu: Saint Fanourios Cake: On Guard!  This praying mantis (also known as stick insect) is scarily adorable. Imagine the patience it would take to hold this...

Saint Fanourios Cake


On Guard! 

This praying mantis (also known as stick insect) is scarily adorable.


Imagine the patience it would take to hold this pose for hours.
He was only 2.5cm long and so beautiful.


My husband brought back recently a cake from a lovely bakery in Bulahdelah, ripe with walnuts and spices and I was reminded of this recipe given to me by an old Greek friend.  Not that I have lost anything yet but this cake is a Greek tradition as Saint Fanourios is the finder of lost objects and his Saints day is on August 27.  He can also apparently reveal the destiny of unmarried girls.  To petition the saint this ceremonial cake known as fanouropita must be presented as well as a votive offering and a silver effigy of the lost object.


I have actually lost my husband who is away for a week but I don't think cooking this gorgeous cake will bring him back any earlier than planned.  In fact I find every night these last four nights when the children are in their rooms and I am alone that I am keeping very busy, cooking and creating lotions with the television on in the background or talking with friends on the phone and staying up much later than normal.
What a  productive week it has been, the time is passing by quickly and hubby will be home very soon.
It may be that the magic of the fanouropita is working to bring him back quicker than expected.


I love reading about the Greek mythology, folk lore and saints, they have so much tradition.
When the tradition includes such heavenly delights as this one, it is even more enjoyable.


Saint Fanourios Cake

1 1/2 cups self raising flour
1 1/2 cups walnuts, coarsely chopped
1 teaspoon ground cinnamon
1 teaspoon ground cloves
1/2 cup freshly squeezed organic orange juice
4 tablespoons brandy
1/2 cup vegetable oil
4 free range eggs
1 1/2 cups castor sugar
Prepare a 20 x 30cm baking pan with melted butter and flour, or line with baking paper.
Preheat oven to 180 C (350 F).
In a large bowl combine flour, walnuts, cinnamon and cloves.
Blend the orange juice, brandy and oil together until well combined.
In another bowl beat the eggs and castor sugar together until fluffy.
Pour the liquid ingredients over the flour mixture and gently fold through until combined.
Pour into the prepared pan and bake for approx 45 minutes or until a skewer inserted comes out clean.
Remove from oven and let rest 10  minutes before turning out onto a wire rack to cool.
Dust with sifted icing sugar to serve.

Buon appetito, enjoy Merryn

I hope, that whatever you have lost, will now be found again.

Wednesday, 18 June 2014

Merryn's Menu: Ginger Pork - Shogayaki

Merryn's Menu: Ginger Pork - Shogayaki: Ginger Pork - Shogayaki Today I experienced an incredibly busy day.  Work was busy, with many customers filing in through the doors.  ...  I needed a quick dinner to create, shogayaki was the answer!

Merryn's Menu: Ginger Pork - Shogayaki

Merryn's Menu: Ginger Pork - Shogayaki: Ginger Pork - Shogayaki Today I experienced an incredibly busy day.  Work was busy, with many customers filing in through the doors.  ...  I eneeded a quick dinner to create, shogayaki was the answer!

Ginger Pork - Shogayaki

Ginger Pork - Shogayaki


Today I experienced an incredibly busy day.  Work was busy, with many customers filing in through the doors.  An old and dear friend phoned me unexpectedly (but welcomingly). My mother popped in for coffee and then a late customer came who kept me after hours.


I finally arrived home, after stopping for a quick trip to the supermarket where I decided to cook an old Japanese dish, Shogayaki, which literally means grilled ginger pork.

I placed the pork fillet on the bench and started getting out the flavourings when I realised I had to return to the office to retrieve a phone number to give to my husband (for work).
So, in good humour, and now slippers, I drove back to the shop, looked for  the information needed and returned home.  By now it was 6:45pm and I needed to get home - quickly!
(By the way I didn't find the correct phone number needed at all.  I searched through day books, invoice books and contact lists but the number needed was nowhere to be found.  Isn't that the case when you desperately need something?)

Anyway ... I chopped vegetables for stir frying and placed fresh noodles to soften in a warm water bath.  Then I thinly sliced the pork fillet and put together the pork seasoning flavours and heated up the pans.


Shoga means ginger and yaki refers to frying or grilling in Japanese.
Make sure to season the pork on both sides with salt and pepper.
You can use chicken or beef but pork is the traditional choice for Shogayaki


Shogayaki (Ginger Pork) Recipe

  • ½ 700g thinly-sliced pork loin
  • ¼ onion
  • 2 cloves garlic
  • 1 inch ginger (about 1 tsp finely chopped)
  • Salt
  • Freshly ground black pepper
  • 2 Tbsp. oil
  • 2 spring onions, finely chopped
Seasonings
  • 2 Tbsp soy sauce
  • 2 Tbsp mirin
  • 2 Tbsp sake
  • 1 tsp. sugar

Mix together the onion, minced garlic, finely grated ginger with spring onions, then combine with soy sauce, mirin, sake and sugar.
Thinly slice the pork fillet, season pork on both sides with salt and ground black pepper.
Heat up large pan to medium high, add 2 tablespoons oil and place pork slices in pan, cook for 1 minute, then turn over and cook 1 more minute.  Pour over combined seasonings, then take off heat and serve.
This is very quick to cook and serve, do not cook for too long as it can become tough.

I served this with stir fried vegetables and hokkien noodles dressed with a terayaki sauce.


By the way I didn't find the correct phone number needed at all.  I searched through day books, invoice books and contact lists but the number needed was nowhere to be found.  Isn't that the case when you desperately need something?


Buon appetitio, enjoy Merryn

Tell me, what is your favourite go - to dish when you are in a hurry to cook?

Thursday, 12 June 2014

Merryn's Menu: Slow Cooked Turkey and Bean Soup - my unique creat...

Merryn's Menu: Slow Cooked Turkey and Bean Soup - my unique creat...: Slow Cooked Turkey and Bean Soup On Sunday I purchased some gorgeous pork spare ribs.  Hubby commented how he adores the pork spare rib...

Merryn's Menu: Chilli Blue Swimmer Crabs cooked with Mussels

Merryn's Menu: Chilli Blue Swimmer Crabs cooked with Mussels: One of the advantages of living in a coastal town is buying lovely, fresh local seafood while it is seasonal. When we were children we wo...

Chilli Blue Swimmer Crabs cooked with Mussels


One of the advantages of living in a coastal town is
buying lovely, fresh local seafood while it is seasonal.


When we were children we would catch the haphazard crabs roaming the rocks and cook them in
cans that simmered over an open fire that were filled with salt water.  So simple and yet so delicious.
Little did we realise that we were starting a life long obsession, cooking fresh crabs with delightful flavours.

When we were children, crabs, fish, abalone and oysters were abundant and readily available. 


Now, as an adult, I still adore crabs and also spicy food.  

Chilli, garlic, turmeric and ginger are at the top of my list.

With the onset of June, we know the oysters, crabs and prawns are not as big or plentiful during winter. 
  When I saw these gorgeous local blue swimmer crabs, I couldn't resist having one last seasonal feast.  
These mussels (sourced from south of Sydney) were an added bonus and a welcome addition to our meal.


My recipe is adapted from the many chilli crab recipes available.

Chilli Blue Swimmer Crab with Mussels

8 fresh big blue swimmer crabs
1 kilo fresh black mussels
1/3 cup olive oil
10 garlic cloves, finely chopped
2 fresh long red cayenne chillies, chopped
3/4 cup tomato passata
1/3 cup white sugar
1/4 cup fish sauce
2 tablespoons malt vinegar
1/4 cup shaoxing wine
freshly ground black pepper
1/2 cup fresh coriander leaves, chopped, for garnish

To clean the crabs, lift off the top shell with a knife from the underside then pull off the top shell.  Cut crabs in half, then into quarters,  preferably with a cleaver, and discard the grey soft matter.  Rinse under cold water to clean the crab.  Roughly use the back of the knife to lightly push on and crack the claws.
In a large frying pan heat the olive oil and fry the garlic and chilli for about 1 minute over a medium heat.  Add the crab pieces and give everything a stir to incorporate flavours. 
Add the tomato passata, white sugar, fish sauce, shaoxing wine, malt vinegar and black pepper, stirring to incorporate the flavours.  
Cover with a lid, reduce heat to low and cook for about 8  minutes.  Remove lid and add cleaned and debearded mussles to mixture.  Put lid back on, give it a mild shake and cook for 3 more minutes.
Take off lid and add the chopped coriander leaves, tossing to combine.
Taste for seasoning, adding more pepper and salt to taste.
Serve on a big platter, accompanied by a big loaf of crusty bread and a fresh, clean garden salad.

Buon appetito, enjoy, Merryn.


Monday, 9 June 2014

Slow Cooked Turkey and Bean Soup - my unique creation

Slow Cooked Turkey and Bean Soup


On Sunday I purchased some gorgeous pork spare ribs.  Hubby commented how he adores the pork spare rib pieces one of our local restaurants serves as an entree and I said they would be deep fried.
So I simmered the plump ribs in a mild stock for 45 minutes until they were soft.
Draining them on paper towel my hubby decided he would take over, chopping them into large chunks and heating up 6cm of vegetable oil in the wok.  He delightedly placed about 10 in the wok  acting a bit like a master chef contestant.  
A minute later one of the pieces literally exploded, landing hot oil on his arm, 
then another, he was so lucky it didn't get in his eyes.  


Note that my pasta and bean salads where well and truly ready by this time.

Hot oil was flying through the air, drenching the bench, the floor and everything within a 2 metre radius.
'Put down a towel he said', as he clambered for a lid to try to take the brunt of the flying oil.  (Note too that I don't yet own a splatter screen.)   After another two rounds of the crispy deep fried pork and the oiling of my kitchen, he proudly served up his plate to the table like a maitre'd at a michelin star restaurant.
He mopped the floor before calling the family.   I had to shake my head and said ýou are never cooking that again in my kitchen'.   It took another two hot mops to totally eradicate the slippery vegetable oil.

We did however, laugh and laugh together, it was quite an amusing moment and a very funny evening.
We have all had a disaster in the kitchen and these epic moments become fond memories.


Needless to say that on Monday evening I opted for a safe, clean, easy dinner.
I spotted this pack of two huge turkey drumsticks and thought they would be great in a soup, slow cooked.
Note that if you don't have a slow cooker they would be also well cooked on low on your stovetop.


Slow Cooked Turkey and Bean Soup

2 turkey drumsticks
4 tablespoons olive oil
2 onions, finely chopped
3 cloves garlic, finely chopped
2 carrots, chopped
1 celery stick, finely chopped
2 bay leaves
1 cup dried canellini beans, rinsed
1/2 cup soup mix (dried lentils, beans and barley)
1.4 litres chicken stock (home made is best)
salt and pepper

Heat the oil in a large frying pan, rinse and pat dry the turkey drumsticks, season with salt and pepper then brown them all over.
Place into your slow cooker.  Fry the onion a few minutes, then add the garlic, carrots and celery. Cook for 3 - 5 minutes until slightly soft and they have absorbed any oil.
Put these on top of the turkey drumsticks with the bay leaves.
Heat up your chicken stock, mine was frozen so I placed the whole block in the pan to heat up.
Meanwhile add the canellini beans and soup mix to the pot and pour the stock over it all.

Cook on low for 7 - 8 hours or on high for 6 hours.
Remove the drumsticks carefully and shred the meat, discarding the bones and skin.
Return meat to soup and heat through.
Check seasoning and serve with a loaf of crusty bread.
Serves 8 people.


Buon appetito, Merryn.

Saturday, 31 May 2014

Merryn's Menu: Winter Garden Delights

Merryn's Menu: Winter Garden Delights: June in the Garden The coolest months are upon us, and as we pass from Autumn to Winter our gardens magnify to heap before us, all grea...

Winter Garden Delights

June in the Garden

The coolest months are upon us, and as we pass from Autumn to Winter

our gardens magnify to heap before us, all great vegetables that thrive at this time.


Various vegetables to take us through winter.    Lettuces, tomatoes, fennel, capsicum, endive, shallots, leeks, cabbage, broccoli to bok choy and eggplant.


We have protected the new garden beds from the chickens and placed watering systems in most.
Below are some of the more unusual trees I have collected.


The above one is a sour sop, which will shortly lose its leaves for winter.
Below is a Drumstick, or Horseradish tree, let's just say it was a good idea at the time.
Surely I am not the only one who indiscriminately collects unique trees?


On the left is an Anise Myrtle tree which has a gorgeous aniseed flavour.

To the right is my Pandan tree which is thriving and multiplying with pups.
Not watering very much is the secret to success for this Pandan tree.

Underneath is a potted curry tree,  Murraya koenigii
which is a very useful addition to curries and stir fries.

A lemon myrtle tree below, has been growing solidly since being planted in the ground 4 weeks ago.

This peach tree was pruned four weeks ago and it already has beautiful pink peach flowers.


One of these trees is a Valencia orange while the other is a Blood Orange.  
Time will tell which is which, as they were moved last Spring.


This is a post for the Garden Share Collective hosted by Lizzie at Strayed from the Table.
You can see the other members gardens here.
This is also posted on my Facebook page.
Thank you for walking around my garden on the 1st June 2014.
Kind regards, Merryn.

Wednesday, 28 May 2014

Beeswax Hand Cream - Home Made

Beeswax Hand Cream with Macadamia and Coconut Oils

One reason why I started a web blog, was to connect with like minded people
and share my joy of cooking/creating/gardening
and enjoy sharing these hobbies during quiet times.


It is wonderful to relax  during the day and browse my favourite blogs
reading about what other people have been cooking or creating.


I read many different hand creme, salve and lotion recipes
then adapted what I had in my kitchen to incorporate what I thought would create a good combination.


I thought it was cute to strain the beeswax from our last honey harvest
into heart shaped molds I have had forever.


Gather your oils, beeswax and Vitamin E oil and place into a small saucepan.
This is an old one I specifically keep for melting non food items.


Add your preferred essential oils as soon as you take the lotion off the heat.
Here is my delightfully creamy hand creme with a beautiful consistency.
When you rub some between your hands it at first feels a little greasy but is quickly absorbed
making your hands lovely, soft and moisturised.


Merryns's Beeswax Hand Creme 

½ cup macadamia oil 
½ cup olive oil 
½ cup coconut oil 
½ cup beeswax, grated 
5 vitamin E capsules, pierced with a pin and the oil squeezed out 
10 drops rose geranium essential oil
10 drops lavender essential oil.


Place the macadamia oil, olive oil, coconut oil and grated beeswax in a small saucepan.
Place saucepan on top of boiling water in another, bigger saucepan until melted.
This only takes 3 - 4 minutes.   Then add essential oils.
Pour product into small containers and let cool.

Buon appetito, enjoy Merryn.

Tuesday, 27 May 2014

Monday, 26 May 2014

Beeswax and Coconut Lip Balm (home made)

One of the beautiful by products of honey is

BEESWAX


When you extract the honey you have all of this glorious, sweet smelling, luscious beeswax.

I have experimented with beeswax lip balm, hand cream and face scrub.
Here is my preferred beeswax lip balm.


Moisturising for your lips, non greasy, light and lovely. 


Measure your ingredients; I finely chopped the beeswax but you can also grate it.
Add the coconut oil, vitamin E and lanolin cream
(you can use pure lanolin oil instead.)


Add your essential oils after the oils have been heated.

  • Beeswax Lip Balm Recipe
25 grams pure beeswax
40 grams coconut oil
4 capsules of Vitamin E
1 heaped teaspoon of Lanolin cream
6 drops lemon myrtle essential oil
6 drops peppermint essential oil
4 drops lavender essential oil

Place beeswax, coconut oil, the vitamin E oil that has been squeezed out of the capsules (pierce capsules with a pin first) and the lanolin into the small saucepan.
Place on top of a larger saucepan with boiling water and stir until dissolved, approx 3 -5 minutes.
Remove from heat and add essential oils, to achieve your desired fragrance.
Let cool, then test before bottling.
       
Buon appetitio, Enjoy, Merryn.

Saturday, 3 May 2014

Merryn's Menu: Garden Share Collective May Gardening

Merryn's Menu: Garden Share Collective May Gardening: Autumn is definitely here, producing lovely sunny days with cooler mornings and evenings. The perfect climate for growing capsicums. ...

Garden Share Collective May Gardening


Autumn is definitely here, producing lovely sunny days with cooler mornings and evenings.

The perfect climate for growing capsicums.


Sweet Fennel


I have started a new herb garden against a north facing brick wall.
The shredded paper was padding for an object posted to me,
I decided to use it as mulch.  Anything from straw to paper, helps to keep the soil moist
and stop your delicate plants from drying out too quickly.

To the right is a new male kiwifruit plant I finally purchased.
My 3 year old female on the left has been alone for a while
and kiwifruit need male and female plants for pollination.
I will remember to water this one.


Shopping for plants is like going into a jewellery store.
You have to try hard not to get distracted.
Well, not too much anyway.
So I found this really cute cinnamon tree ~ if it lives for just 5 years it will pay for itself.


... and this adorable macadamia tree.


Here are winter tomatoes raised from seed and planted in a northerly position
against a brick wall that retains the heat and give the tomato plants extra warmth.


My Tahitian Lime and Eureka Lemon trees
bursting with glorious citrus fruit.

Our next banana bunch, growing in size and strength.


Blueberry bushes, a Biloxi and a Misty.
They will cross pollinate each other and grow up to 1m in size.
I have potted them into bigger pots as I want them to grow bigger before planting in the ground.


I trust you have enjoyed viewing my garden 
and I will do my best to keep everything watered and alive.
Please have a look at the other Garden Share Collective members gardens this month.

Buon appetito, Enjoy, Merryn.

Merryn's Menu: Chicken, Leek and Mushroom Pie

Merryn's Menu: Chicken, Leek and Mushroom Pie: Full of flavour Chicken and Leek Pie I often plan dinners ahead, although food being an emotional enjoyment is also often decided daily...

Chicken, Leek and Mushroom Pie

Full of flavour Chicken and Leek Pie


I often plan dinners ahead, although food being an emotional enjoyment is also often decided daily.
On this Monday I had planned to cook a chicken and leek pie that evening, after work.
On this day while having my morning caffe latte and browsing the day's emails 
I was fortunate to find and read Billy Law's latest post featuring 
game-of-thrones-faux-pigeon-pie and I highly recommend you have a look as well.
I was not quite inspired enough to cook all of the trimmings, time is precious after work!
Billy's recipe was adapted to suit my ingredients and the time available.  It was a huge success.


Short crust pastry with Lard
500g all-purpose plain flour, extra for dusting
150g cold unsalted butter, cut into small cubes
100g lard
1/4 cup cold water
Place flour, butter and lard into a food processor.  Blend until it just looks like breadcrumbs.
Lightly pulse, adding the water in a stream until it comes together as a ball.  
Place in bowl, cover with plastic wrap and refrigerate for 30 minutes.

Chicken and Leek Filling
2 tablespoons butter
2 big leeks, white part only, thinly sliced
350g  white mushrooms, thinly sliced
900g chicken thigh fillets, diced into 1 - 2cm cubes
2 tablespoons butter, extra
¼ cup all-purpose plain flour200ml Chicken Stock
200ml cream
1 tablespoon flat leaf parsley, finely chopped
1 tablespoon dried oregano
2 tablespoons chopped fresh thyme (or 1 tablespoon dried)
salt and white pepper
1 egg
Melt butter in a large heavy based  frying pan over medium heat, add 2 tablespoons butter, the leeks and mushrooms, sauté for 5 minutes.  Add the chicken pieces and fry another 10 minutes or until the chicken is cooked through.  Sprinkle the flour over this mixture and cook for a further couple of minutes. Gradually stir in the hot stock sitrring constantly, then add the cream. Add herbs and simmer gently over low heat until the mixture has thickened.    Season with salt and white pepper.  Allow to cool slightly.
Preheat oven to 200 celsius.
Take 2/3 of the lard pastry and roll pastry out until it is wide enough to cover the bottom and sides of a 20-cm springform tin. Place a sheet of baking paper on top of the pastry and fill with baking beans (weights to stop pastry rising) then cook for 20 minutes.  
Remove and take away the paper and weights.  Bake for another 10 minutes.  Remove from oven.
Fill pastry case with chicken, leek and mushroom filling.
Roll out the remaining pastry and cover the pie with this lid, squeezing the lid to the sides to seal the pie.
Beat an egg with a little milk and brush the pie with this egg wash.
Place the pie on a baking tray, bake pie in oven for 35 - 40 minutes. 
Remove and let rest for 5 - 10 minutes.

Buon appetito, enjoy. Merryn