Showing posts with label salt. Show all posts

Tuesday, 16 September 2014

Preserved Lemons - so simple to make at home.

I have a few cookbooks, many on different cuisines as you take a gastronomic trip around the world.
Going through different cooking phases, Preserved Lemons crop up in many Middle Eastern recipes.


How pretty is this on your pantry shelf!


The first time I was given a jar of preserved lemons, no one told me to discard the flesh.
They were really bitter.


These are funny looking specimens.


However, the preserved lemon rind is delicious.

Finely chopped and added to a mozzarella, tomato and olive salad with a lemony dressing,
or slow cooked in a delicious sauce with roasted lamb.


Preserved Lemons

Ideally use organic, unwaxed lemons.

8 lemons, washed and dried
1 1/2 cup fine sea salt
1 cinnamon stick
3 dried bay leaves
1 tablespoon black pepper corns
1 extra lemon, juiced
2 cups boiling water, approximately.

Large glass jar with a tight fitting lid, sterilised.

Cut lemons vertically into quarters but not the whole way through, just so that they open outwards.
Pack the lemons with salt and place into the bottom of the jar, pushing them together so they fit snugly and with no gaps.   Pour some salt on top of the bottom layer, add half of the spices, then lay the remaining lemons on top.  Cover with salt, add the remaining spices and cinnamon stick. 
Squeeze over the juice of one lemon and cover the lot with boiling water.  You do not want the lemon protruding above the liquid.
Seal, label, then place into a dark corner of the pantry for one month.

When using, remove the lemon, taking out how much you require and rinse in fresh water.
Discard the flesh and any pith then finely chop the rind to use in many recipes.

Bon appetito, enjoy Merryn

Wednesday, 18 June 2014

Ginger Pork - Shogayaki

Ginger Pork - Shogayaki


Today I experienced an incredibly busy day.  Work was busy, with many customers filing in through the doors.  An old and dear friend phoned me unexpectedly (but welcomingly). My mother popped in for coffee and then a late customer came who kept me after hours.


I finally arrived home, after stopping for a quick trip to the supermarket where I decided to cook an old Japanese dish, Shogayaki, which literally means grilled ginger pork.

I placed the pork fillet on the bench and started getting out the flavourings when I realised I had to return to the office to retrieve a phone number to give to my husband (for work).
So, in good humour, and now slippers, I drove back to the shop, looked for  the information needed and returned home.  By now it was 6:45pm and I needed to get home - quickly!
(By the way I didn't find the correct phone number needed at all.  I searched through day books, invoice books and contact lists but the number needed was nowhere to be found.  Isn't that the case when you desperately need something?)

Anyway ... I chopped vegetables for stir frying and placed fresh noodles to soften in a warm water bath.  Then I thinly sliced the pork fillet and put together the pork seasoning flavours and heated up the pans.


Shoga means ginger and yaki refers to frying or grilling in Japanese.
Make sure to season the pork on both sides with salt and pepper.
You can use chicken or beef but pork is the traditional choice for Shogayaki


Shogayaki (Ginger Pork) Recipe

  • ½ 700g thinly-sliced pork loin
  • ¼ onion
  • 2 cloves garlic
  • 1 inch ginger (about 1 tsp finely chopped)
  • Salt
  • Freshly ground black pepper
  • 2 Tbsp. oil
  • 2 spring onions, finely chopped
Seasonings
  • 2 Tbsp soy sauce
  • 2 Tbsp mirin
  • 2 Tbsp sake
  • 1 tsp. sugar

Mix together the onion, minced garlic, finely grated ginger with spring onions, then combine with soy sauce, mirin, sake and sugar.
Thinly slice the pork fillet, season pork on both sides with salt and ground black pepper.
Heat up large pan to medium high, add 2 tablespoons oil and place pork slices in pan, cook for 1 minute, then turn over and cook 1 more minute.  Pour over combined seasonings, then take off heat and serve.
This is very quick to cook and serve, do not cook for too long as it can become tough.

I served this with stir fried vegetables and hokkien noodles dressed with a terayaki sauce.


By the way I didn't find the correct phone number needed at all.  I searched through day books, invoice books and contact lists but the number needed was nowhere to be found.  Isn't that the case when you desperately need something?


Buon appetitio, enjoy Merryn

Tell me, what is your favourite go - to dish when you are in a hurry to cook?

Saturday, 3 May 2014

Chicken, Leek and Mushroom Pie

Full of flavour Chicken and Leek Pie


I often plan dinners ahead, although food being an emotional enjoyment is also often decided daily.
On this Monday I had planned to cook a chicken and leek pie that evening, after work.
On this day while having my morning caffe latte and browsing the day's emails 
I was fortunate to find and read Billy Law's latest post featuring 
game-of-thrones-faux-pigeon-pie and I highly recommend you have a look as well.
I was not quite inspired enough to cook all of the trimmings, time is precious after work!
Billy's recipe was adapted to suit my ingredients and the time available.  It was a huge success.


Short crust pastry with Lard
500g all-purpose plain flour, extra for dusting
150g cold unsalted butter, cut into small cubes
100g lard
1/4 cup cold water
Place flour, butter and lard into a food processor.  Blend until it just looks like breadcrumbs.
Lightly pulse, adding the water in a stream until it comes together as a ball.  
Place in bowl, cover with plastic wrap and refrigerate for 30 minutes.

Chicken and Leek Filling
2 tablespoons butter
2 big leeks, white part only, thinly sliced
350g  white mushrooms, thinly sliced
900g chicken thigh fillets, diced into 1 - 2cm cubes
2 tablespoons butter, extra
¼ cup all-purpose plain flour200ml Chicken Stock
200ml cream
1 tablespoon flat leaf parsley, finely chopped
1 tablespoon dried oregano
2 tablespoons chopped fresh thyme (or 1 tablespoon dried)
salt and white pepper
1 egg
Melt butter in a large heavy based  frying pan over medium heat, add 2 tablespoons butter, the leeks and mushrooms, sauté for 5 minutes.  Add the chicken pieces and fry another 10 minutes or until the chicken is cooked through.  Sprinkle the flour over this mixture and cook for a further couple of minutes. Gradually stir in the hot stock sitrring constantly, then add the cream. Add herbs and simmer gently over low heat until the mixture has thickened.    Season with salt and white pepper.  Allow to cool slightly.
Preheat oven to 200 celsius.
Take 2/3 of the lard pastry and roll pastry out until it is wide enough to cover the bottom and sides of a 20-cm springform tin. Place a sheet of baking paper on top of the pastry and fill with baking beans (weights to stop pastry rising) then cook for 20 minutes.  
Remove and take away the paper and weights.  Bake for another 10 minutes.  Remove from oven.
Fill pastry case with chicken, leek and mushroom filling.
Roll out the remaining pastry and cover the pie with this lid, squeezing the lid to the sides to seal the pie.
Beat an egg with a little milk and brush the pie with this egg wash.
Place the pie on a baking tray, bake pie in oven for 35 - 40 minutes. 
Remove and let rest for 5 - 10 minutes.

Buon appetito, enjoy. Merryn

Wednesday, 29 January 2014

Crab Fried Rice

Crab Fried Rice - My Unique Recipe


I have amazing days at work.  They can be incredibly hectic, talking to so many people, 
or quiet, gentle days when I can sit, read and reflect on things.
I prefer the busy days as they fly by and it is 4.30pm before you know it.
I pop into the supermarket on the way home to purchase the nights' dinner ingredients 
which ensures you always run into one or two friends which can be so entertaining.


This evening I bumped baskets with a very creative friend of mine.
This energetic friend throws everything in with anything to create a meal.
There were tins of crab for about $2 each where we were standing
so I bought a few, envisioning sang choy bau or crab + lettuce sandwiches.
Ms Creative said that she threw crab in with left over rice and vegetables.
I thought why not, but I would rather fry it.


Meanwhile Ms Creative and I walked together and were passing the fresh vegetable section when we
saw a man eating grapes.  Not just one, but he had a whole big bunch in his hand
and was standing there devouring it!  Seriously, I tried so hard not to look at him;
he was definitely not a local person - you just can't do that.
I did however leave the supermarket with a big smile on my face.


So a quick google search later revealed a few crab fried rice recipes,
which I glanced at before deciding to cook it my way.
This is what I came up with and cooked for lunch the next day - it was delicious!


Crab Fried Rice

2 cups cold cooked rice
150g cooked crab
1 egg
1 small onion, chopped
1 clove garlic, finely chopped
1 teaspoon curry powder 
1 tablespoon soy sauce
1 tablespoon fish sauce
white pepper and salt
vegetable oil
coriander leaves and a slice of lime for garnish

Heat up your wok, add oil and stir fry onion 2 minutes, add garlic and cook 1 more minute.
Toss in the rice and curry powder, cook 1 minute, add flaked crab and cook 1 more minute.
Move to the side and add the egg, slightly frying before folding through the rice mixture.
Add the soy and fish sauces, season with white pepper, taste before adding salt.
Slide onto a serving plate, garnish with coriander leaves and a slice of lime on the side.

Serves 1

Buon appetitio!  Enjoy, Merryn

Thursday, 28 November 2013

Capsicums stuffed with Vegetables - My Unique Creation

Capsicums filled with Vegetables

Perfect Vegetarian Fare for Spring


Firstly I chopped up vegetables, and fried them in olive oil until just cooked.


Then I halved 2 freshly picked green capsicums, removing the membrane and seeds.
Placing the capsicum halves into a foil lined and olive oil sprayed tray,
they were then filled with the cooked vegetable mixture.


Mozzarella was grated over the top and I placed the tray into a pre heated oven
180 Celcius and cooked for about 25 minutes, 
until the capsicums were soft and the cheese was melted. 


What a delightful vegetable accompaniment, or served as a tasty entrée.
 

Vegetable Filled Capsicums

 Ingredients
1 eggplant, cut into 1cm cubes
1 potato, peeled and chopped into 1cm cubes
2 celery stalks, finely chopped
1 zucchini, cut into 2cm cubes
1 onion, sliced finely
1 garlic clove, finely chopped

1 tablespoon salted capers, rinsed
3/4 cup Passata, (or 3 tomatoes, chopped)
Handful parsley, chopped
1 pinch dried oregano
1 cup grated mozzarella cheese
6 green capsicum, halved and with membrane removed.
1/4 cup olive oil
olive oil spray

Directions
Preheat oven to 180 degrees celsius.

Heat up a large frying pan, pour in the 1/4 cup olive oil, add eggplant and fry for 2 mins per side over a medium high heat.  Add potato, celery, zucchini and onion, turn down to a medium heat and stir occasionally , cooking for 8 minutes. 

 Add the garlic, capers and chopped tomatoes. Cook another 3 minutes. 

Ad the herbs, salt and pepper, tossing through the vegetable mixture. 

Line a baking tray with foil.  Spray lightly with olive oil and place the prepared capsicums, cut side up in the tray. 

Put the vegetables into the capsicums, piling them high as they will shrink when baked.
Top with mozzarella, spray with a little olive oil and bake for 25 - 30 mins until the cheese is melted.
Enjoy!

I  would love to hear how you bake capsicums.           Buon appetito, Merryn


Thursday, 23 May 2013

Chocolate Snow Cookies

Chocolate Snow Cookies


These a feast for your eyes, delectable, attractive and delicious.
We were having tradesmen doing work on our house, from external painting through to woodwork.
The men were such cheerful souls, bustling in at 7.30am and working hard until they stopped for a cup of coffee and snack around 10.30am.  There were continual comings and goings through the house from the front to the rear.  These men were so happy, they obviously loved what they did and whistled while they worked.  I was so grateful the least I could do was to make them coffee and bake them a batch of cookies.


This is how this all-in-one super quick food processor recipe came about.
You do not have to sift anything either as the food processor will do all the work for you.

Chocolate Snow Cookies
1 1/2  cups self raising flour
1 cup white sugar
1/2 cup cocoa powder
1 teaspoon salt
75 grams butter
1/2 teaspoon vanilla extract
2 eggs

Extra:  1 cup icing sugar for coating dough balls, sifting is optional.


Put all dry ingredients into your food processor.  Lightly mix then add cubed butter and mix until it resembles fine breadcrumbs.
Add 2 eggs, 1 at a time, add vanilla extract and mix until it comes together as a ball.
Remove and roll into small balls, then coat in icing sugar generously.  

Place on paper or silicon lined baking trays and bake at 180 C for approx 10 minutes.   
Yields about 35 cookies.


Roll dough balls in icing sugar before placing  on tray.


When cooked they literally crack and the icing sugar creates a beautiful snow like effect on the chocolate cookies.


The wonderful tradesmen were very appreciative of my efforts and tried extra hard to give us a good result for the house with minimal charge.  I think you get always back what you give :D


Please, if you have enjoyed my post, let me know.
Buon appetitio Merryn :D

Monday, 6 May 2013

Spanakopita

Spanakopita

(Spinach and Feta Pie)

I was first introduced to Spanakopita by the wife of a Czechoslovakian ambassador in early 1990.  She is a gorgeous woman, full of life and she absolutely loves our good Australian beaches.  How she survives with her pale white skin after endless beach days is quite beyond me, perhaps she has always had 30+ sunblock.
I distinctly remember she put ingredients into a saucepan, sauteed the spinach, onion and (in her case, garlic) then removed it from the heat to add parsley, egg and breadcrumbs.    All of this completed whilst still in her bikini!  Now she is back in Czechoslovakia and not beach swimming regularly but I know memories of her Bondi summers sustain her through the coldest of Czechoslovakian winters.

There are so many versions of Spanakopita but this is one we enjoy and with the abundance of fennel fronds and spinach/silverbeet every pie tastes as good as the last.


It is Autumn in Australia, a beautiful season with great weather and a slow introduction to winter, including comfort food and warm, creamy delights.  Spinach, or it's neighbour silverbeet, grows in our mid north coast region all year around.  We love it, the chickens love it as well as the grubs and we have to grow plenty to make sure we all get our share.

 Luckily the turtles do not seem to eat spinach.  The turtles rescued from the middle of a nearby busy street should be appreciative for their lives, but no, they think any lettuce or kale plant in their path is worthy of a good feed by bypassing the guppies and greens in the pond in favour of lighter greens.  Ungrateful turtles.


We do not know where the turtles sleep, but we sure know what they eat!


There are so many versions of Spanakopita but this is one we enjoy and with the abundance of fennel fronds and spinach/silverbeet every pie tastes as good as the last.
Spanakopita is very versatile.  It is great for lunch as the star dish, served with a salad and crusty bread , or served as a side vegetable offering anytime.

You can use thawed frozen shortcrust pastry for the base and thawed frozen puff pastry  for the top of the pie. Filo pastry slathered with plenty of butter is a great pie pastry as well.  Brush either of these with an egg wash before baking.

I stumbled across this Provencal Pastry recipe from Peter of Souvlaki for the Soul http://souvlakiforthesoul.com/2009/12/kohlrabi-and-greens-pie and have been using it for my Spanokopita ever since as it is easy, light and does not require blind baking.


Provencal Pastry ingredients

2 cups plain flour
1/4 cup olive oil
1/4 cup tepid water
1 egg
1/4 teaspoon salt
Method:
Blend all the ingredients together in a food processor until they form a ball.   Remove it from the bowl, smooth it out, cover with plastic wrap and let it rest in the fridge for about 1 hour-I find 40 minutes is enough.


Spanakopita Ingredients

 300g Spinach or Silverbeet, washed and finely chopped
100g Feta, crumbled
1/3 cup fresh parmesan cheese, grated
 4 green shallots, finely sliced
1/2 cup fresh fennel fronds, finely chopped
2 Tablespoons fresh Italian parsley, finely chopped
2 eggs, lightly beaten

Freshly ground black pepper, to taste.

Method:  Place all ingredients into a large bowl and mix together.  I do not add salt as the feta is salty enough, but check for seasoning, you may want to add salt.

Preheat oven to 180 Celsius fan forced.
Take your pastry that has been rested and roll out to fit a 20cm square baking tin.  Spray the tin with olive oil.  Divide pastry into thirds, roll two thirds out to cover base and sides of tin.  Press gently into corners.
Place the filling inside, smoothing it out evenly.
Roll remaining third of pastry and place on top.
Prick all over with a fork and brush or spray with olive oil.
Cook for 25 minutes, it will be a pale golden brown and crisp when ready.


Buon appetito!
If  you have enjoyed this post,  kindly let me know. Regards Merryn :D


Tuesday, 30 April 2013

Preserved Chilli Peppers in Brine

Chilli Peppers in Brine

Peter Piper picked a peck of pickled peppers
A peck of pickled peppers Peter Piper picked.
If Peter Piper picked a peck of pickled peppers,
How many pickled peppers did Peter Piper pick?


I just love this nursery rhyme from childhood.  The beautiful alliteration is quite catchy and repeating the rhyme is enough to make you smile, a big happy smile :D

Funnily enough my parents ate quite bland food.  Fish or meat with 3 vegetables almost every night.
Both of my parents are steeped in English background.  My mother is a descendent of Matthew Everingham who was on the First Fleet, so I often joked to my friends that we were brought up on bread and water.

Actually, it was more like Sunday roasts with baked vegetables or freshly caught fish with oven baked chips and salad.  I vividly remember the first time I had garlic bread at a friends' house and marvelled at the amazing flavour.  Chilli, not very hot, was enjoyed at the same friends Italian family restaurant and had such an impact on me.

I was mesmerised!  These wonderful flavours had been hiding from me for all of my life.
Since then, my husband says that I am still making up for the lack of heat in my early years.  I love chilli.
I love garlic and chilli, together or apart.  If I have a sore throat the first thing I reach for is a spoonful of harissa or sriracha  to numb my throat and kill the germs (it certainly makes me feel better anyway).

Hence, we grow chillies, of many shapes, sizes and heat strength.
To eat, puree, cook, dry, freeze, give away, jam or to bottle.

This is an easy recipe for bottling whole chillies and I hope you too have the pure enjoyment of chilli peppers.


Leave the chillies whole, wash them and leave some stem on, about 1cm if possible.

Bring salted water to the boil and blanch the chillies in batches, for 1 minute, then remove, place in a colander and refresh with cold water.

Sterilise your jars by placing clean jars into a cold oven, turning the oven to 150 degrees celsius and when it has reached temperature., turn the oven off and let sit for 10 minutes.
Put the lids into a jug of boiling water and let sit 5 minutes, then carefully remove with tongs.

 Bring the vinegar to a simmer in a saucepan, adding the spices and stirring until the sugar is dissolved.


Take the sterilised jars from the oven with oven mitts, placing onto a tea towel on the bench so they don't crack on a cold surface.   Place the whole chilli peppers in the jar, then pour the brine solution over the top completely immersing the chillies in liquid.  You will find after 5 minutes that you need to add more brine as the air pockets in the chillies are filled with liquid.  Put the hot jar lids on and seal, label and let sit for 1 month before consuming.  This recipe will last for 2 years (if you don't eat them all first).

Pickled Chilli Peppers in Brine

600g fresh long chillies
2 tablespoons sugar
2 Tablespoons salt
1 Tablespoon black mustard seeds
10 black peppercorns
4 bay leaves
500ml cider vinegar
500ml white vinegar

Extra salt for boiling water


Rinse chillies, leaving them whole, then boil for 1 minute.  Remove and refresh in cold water.
Add all brine ingredients together and bring to a quick boil, stirring just until the sugar is dissolved.
Place chillies in hot sterilised jars, pour brine solution over until completely covered.
Seal and wait at least 1 month before consuming.
Buon appetito!


Tuesday, 23 April 2013

Preserving Lemongrass in Brine

Lemongrass, fresh and sweetly scented

Perfect for Stir fries, Curries and Jam.

Preserving Lemongrass

Where I live in the mid north coast of New South Wales lemon grass is a constant. 
It grows all year round, healthily and in abundance.  
Like a good extended family, it expands, grows and multiplies.  

 I notice our gorgeous Himalayan cat Chloe loves to chew the sharp grass edges, cleaning her teeth with a citrus flavour.  Lemongrass does have a unique scent which is appealing to animals as well as to us.


While we are lucky to have it growing abundantly, it can be handy at times, especially when you have limited time to prepare dinner, to have a jar of lemongrass already chopped in the fridge.

This is a simple and effective way to preserve the lemongrass.

Remove the green stems and only keep the white part of the lemongrass as this contains all of the flavour.
Roughly chop into 3cm lengths.


Then place into a food processor or blender and blend until finely chopped.


Place the lemongrass into a sterilised jar whilst the jar is still hot.
(To sterilise a jar place in the oven when cold and heat oven to 150 celsius, turn off and let sit 10 minutes.)


Make a brine with1 cup boiling water, 1 tablespoon salt and 1 teaspoon of sugar.
Mix all together and pour over the lemongrass making sure it is all covered with the liquid.


Seal, cool, then store in the fridge until required.


Use in curries, stir fries or savoury jams as required.

Buon appetito, please let me know if you found this post useful.  Cheers Merryn

Monday, 1 April 2013

Home made Sriracha

Stunning Sriracha made at home

Fermented Chilli Paste  


Sriracha is a very versatile, long lasting, hot and delicious fermented chilli paste.  
During the warmer months we have an abundance of chillies and after chilli jam, bottled whole chillies, dried hanging chillies and simply frozen chillies are processed, there is still an abundance of these gorgeous, fiery red chillies.


After reading The Hungry Tigress  http://hungrytigress.com/2012/10/fermented-sriracha/  post on Sriracha (pronunced 'see-ray-shah') I was inspired to make some of this delicious fermented chilli paste.
I weighed 650grams of freshly picked hot chillies for this recipe then washed and dried them.


After cutting off the stem and removing any soft chillies, I put them in the blender to chop them.


When they were processed finely, I added three cloves of minced fresh garlic and 2 tablespoons fine sea salt.


This is how they look at the start of the process.
Cover with plastic film, leave at room temperature and stir once or twice each day for 5 - 7 days.


After two days, they look a little more dull.


After four days, they appear less shiny.


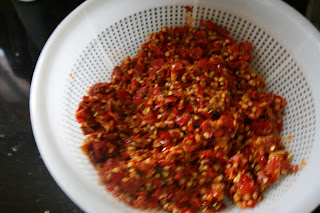
At the end of seven days, at approximately 27 degrees Celcius each day, the Sriracha looks like this :-
and has a slightly sour smell.


At this time place the chillies into a sieve and extract as much liquid as possible from them by pushing down on the chillies to remove the juices that have been extracted.


 Then place chillies into a food processor with 1/4 cup white vinegar and 2 tablespoons of caster sugar.


Process until a paste forms and store in a sterilised jar in the refrigerator.
This paste will last for months and is useful for many purposes.  

Add Sriracha to mayonnaise for a tasty condiment.  
Use alone with barbecued grilled meats for a hot flavour burst.  
Mix a little with scrambled eggs before cooking.  
Use in marinades for chicken with soy sauce, garlic, shao hsing wine and sugar.
Mix with butter and freeze in a log shape to offer with grilled steaks.
Add to fried rice.
Use in place of sambal oelek in recipes.

The uses of Siracha are endless and you will appreciate a jar, or two of this in your kitchen, and at work, as well as in your mother's kitchen for when you are visiting.