Showing posts with label garlic. Show all posts

Wednesday, 18 June 2014

Ginger Pork - Shogayaki

Ginger Pork - Shogayaki


Today I experienced an incredibly busy day.  Work was busy, with many customers filing in through the doors.  An old and dear friend phoned me unexpectedly (but welcomingly). My mother popped in for coffee and then a late customer came who kept me after hours.


I finally arrived home, after stopping for a quick trip to the supermarket where I decided to cook an old Japanese dish, Shogayaki, which literally means grilled ginger pork.

I placed the pork fillet on the bench and started getting out the flavourings when I realised I had to return to the office to retrieve a phone number to give to my husband (for work).
So, in good humour, and now slippers, I drove back to the shop, looked for  the information needed and returned home.  By now it was 6:45pm and I needed to get home - quickly!
(By the way I didn't find the correct phone number needed at all.  I searched through day books, invoice books and contact lists but the number needed was nowhere to be found.  Isn't that the case when you desperately need something?)

Anyway ... I chopped vegetables for stir frying and placed fresh noodles to soften in a warm water bath.  Then I thinly sliced the pork fillet and put together the pork seasoning flavours and heated up the pans.


Shoga means ginger and yaki refers to frying or grilling in Japanese.
Make sure to season the pork on both sides with salt and pepper.
You can use chicken or beef but pork is the traditional choice for Shogayaki


Shogayaki (Ginger Pork) Recipe

  • ½ 700g thinly-sliced pork loin
  • ¼ onion
  • 2 cloves garlic
  • 1 inch ginger (about 1 tsp finely chopped)
  • Salt
  • Freshly ground black pepper
  • 2 Tbsp. oil
  • 2 spring onions, finely chopped
Seasonings
  • 2 Tbsp soy sauce
  • 2 Tbsp mirin
  • 2 Tbsp sake
  • 1 tsp. sugar

Mix together the onion, minced garlic, finely grated ginger with spring onions, then combine with soy sauce, mirin, sake and sugar.
Thinly slice the pork fillet, season pork on both sides with salt and ground black pepper.
Heat up large pan to medium high, add 2 tablespoons oil and place pork slices in pan, cook for 1 minute, then turn over and cook 1 more minute.  Pour over combined seasonings, then take off heat and serve.
This is very quick to cook and serve, do not cook for too long as it can become tough.

I served this with stir fried vegetables and hokkien noodles dressed with a terayaki sauce.


By the way I didn't find the correct phone number needed at all.  I searched through day books, invoice books and contact lists but the number needed was nowhere to be found.  Isn't that the case when you desperately need something?


Buon appetitio, enjoy Merryn

Tell me, what is your favourite go - to dish when you are in a hurry to cook?

Wednesday, 29 January 2014

Crab Fried Rice

Crab Fried Rice - My Unique Recipe


I have amazing days at work.  They can be incredibly hectic, talking to so many people, 
or quiet, gentle days when I can sit, read and reflect on things.
I prefer the busy days as they fly by and it is 4.30pm before you know it.
I pop into the supermarket on the way home to purchase the nights' dinner ingredients 
which ensures you always run into one or two friends which can be so entertaining.


This evening I bumped baskets with a very creative friend of mine.
This energetic friend throws everything in with anything to create a meal.
There were tins of crab for about $2 each where we were standing
so I bought a few, envisioning sang choy bau or crab + lettuce sandwiches.
Ms Creative said that she threw crab in with left over rice and vegetables.
I thought why not, but I would rather fry it.


Meanwhile Ms Creative and I walked together and were passing the fresh vegetable section when we
saw a man eating grapes.  Not just one, but he had a whole big bunch in his hand
and was standing there devouring it!  Seriously, I tried so hard not to look at him;
he was definitely not a local person - you just can't do that.
I did however leave the supermarket with a big smile on my face.


So a quick google search later revealed a few crab fried rice recipes,
which I glanced at before deciding to cook it my way.
This is what I came up with and cooked for lunch the next day - it was delicious!


Crab Fried Rice

2 cups cold cooked rice
150g cooked crab
1 egg
1 small onion, chopped
1 clove garlic, finely chopped
1 teaspoon curry powder 
1 tablespoon soy sauce
1 tablespoon fish sauce
white pepper and salt
vegetable oil
coriander leaves and a slice of lime for garnish

Heat up your wok, add oil and stir fry onion 2 minutes, add garlic and cook 1 more minute.
Toss in the rice and curry powder, cook 1 minute, add flaked crab and cook 1 more minute.
Move to the side and add the egg, slightly frying before folding through the rice mixture.
Add the soy and fish sauces, season with white pepper, taste before adding salt.
Slide onto a serving plate, garnish with coriander leaves and a slice of lime on the side.

Serves 1

Buon appetitio!  Enjoy, Merryn

Thursday, 9 January 2014

Madagascar Bean Medley

We have a very full house at the moment.
MOH (My other half) plus two adults, two teenagers and my good self but I do love the busyness of it all.
I try to keep cooking light and simple over our Summer holiday, especially avoiding baking in a hot kitchen. 
This is an easy dish of Madagascar beans with spinach, garlic and chilli.


 The garden is flourishing, as are our Madagascar beans.
 I bought this plant from an online nursery not knowing how well  it would grow. 
It came as a 40cm high thin vine wrapped around an equally thin stake.


The Madagascar bean is at the front, there is definitely one central plant,
 but there would be more vines as it continually self seeds and grows.   
We planted it next to a 6 metre wooden stake, giving it room to grow.


The pods are plentiful, yielding one or two seeds each.  They are similar to a lima bean.


The seeds are also similar to borlotti beans with their maroon tinge of colour.

                                                                      To cook this Madagascar bean dish, soak the
beans in water for about 8 hours.
Then drain them and add fresh water then cook for approximately 45 minutes, until just soft.


Pour off the water and leave them to drain.

Wash and shred spinach leaves and chop garlic cloves.

Heat a little olive oil in a hot frying pan, add garlic then cook for 30 seconds.

Then add the spinach leaves and toss for 2 minutes, until the spinach is wilted.

Put the drained Madagascar beans in and toss for a futher 2 minutes, until heated through.

I added chopped fresh chilli for garnish but you can easily cook the chilli with the garlic, if preferred.

This gorgeous dish, created from our own bean bush,
when I cooked it the household was impatient that
it took longer to serve as I stopped to take photographs.

~~~~~~~~~~~~~~~~~~~~~~~~~~~~~~

Madagascar Beans with Spinach and Garlic
1.5 cups dried Madagascar beans (You could use borlotti, lima or cannellini beans instead)
Water to cover
3 spinach leaves, washed and shredded
2 small cloves of garlic, chopped
1/4 cup olive oil
salt and pepper
1 red chilli, seeds removed and chopped, for garnish

Soak the beans overnight in cold water,  then rinse and add fresh water.
Bring to a boil and simmer for 45 minutes, until soft.  Drain and reserve.
Heat a medium frying pan to medium-hot.  Add olive oil and cook garlic for 30 seconds.
Add spinach, tossing or stirring for 2 minutes.
Pour in beans and toss for another 2 minutes, until heated through.
Serve, with chopped chilli for garnish.

A great side dish for 6 people.
Or double this amount to serve with extra olive oil and crusty bread with a green side salad as the main meal.

How do you serve your side dish of beans?
Buon appetito!  Enjoy, cheers Merryn

Thursday, 28 November 2013

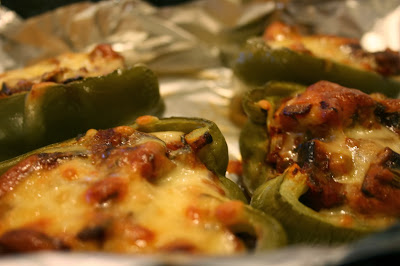
Capsicums stuffed with Vegetables - My Unique Creation

Capsicums filled with Vegetables

Perfect Vegetarian Fare for Spring


Firstly I chopped up vegetables, and fried them in olive oil until just cooked.


Then I halved 2 freshly picked green capsicums, removing the membrane and seeds.
Placing the capsicum halves into a foil lined and olive oil sprayed tray,
they were then filled with the cooked vegetable mixture.


Mozzarella was grated over the top and I placed the tray into a pre heated oven
180 Celcius and cooked for about 25 minutes, 
until the capsicums were soft and the cheese was melted. 


What a delightful vegetable accompaniment, or served as a tasty entrée.
 

Vegetable Filled Capsicums

 Ingredients
1 eggplant, cut into 1cm cubes
1 potato, peeled and chopped into 1cm cubes
2 celery stalks, finely chopped
1 zucchini, cut into 2cm cubes
1 onion, sliced finely
1 garlic clove, finely chopped

1 tablespoon salted capers, rinsed
3/4 cup Passata, (or 3 tomatoes, chopped)
Handful parsley, chopped
1 pinch dried oregano
1 cup grated mozzarella cheese
6 green capsicum, halved and with membrane removed.
1/4 cup olive oil
olive oil spray

Directions
Preheat oven to 180 degrees celsius.

Heat up a large frying pan, pour in the 1/4 cup olive oil, add eggplant and fry for 2 mins per side over a medium high heat.  Add potato, celery, zucchini and onion, turn down to a medium heat and stir occasionally , cooking for 8 minutes. 

 Add the garlic, capers and chopped tomatoes. Cook another 3 minutes. 

Ad the herbs, salt and pepper, tossing through the vegetable mixture. 

Line a baking tray with foil.  Spray lightly with olive oil and place the prepared capsicums, cut side up in the tray. 

Put the vegetables into the capsicums, piling them high as they will shrink when baked.
Top with mozzarella, spray with a little olive oil and bake for 25 - 30 mins until the cheese is melted.
Enjoy!

I  would love to hear how you bake capsicums.           Buon appetito, Merryn


Tuesday, 28 May 2013

Broccoli and Macaroni

Broccoli with Pasta

I absolutely love quick lunches.  Something warm and comforting, completed in under 15 minutes.


Broccoli and pasta fits this description perfectly.  I adore healthy carbohydrates.  Many of my friends have opted, at times, for a low or no carbohydrate diet which I think is crazy.  Your body needs carbohydrates for energy.  These same girlfriends are often seen devouring a whole chocolate block to get enough energy to substitute for the carbs they are no longer getting in their diet.

So keep it lean, tasty, fresh and nutritious and your body will repay you for all good carbohydrates.

Our winter broccoli patch is almost producing broccoli florets.  I watch these gorgeous leafed plants growing and know a good broccoli supply is soon to happen.  Until then I purchase some at our green grocers to curb my winter broccoli desire.


Bring water to boil and add some olive oil.


 Pour in about 200 grams of pasta, I have used macaroni but it can be any pasta.
When it returns to the boil
add broccoli, about 8 big florets, each cut into half and bring to a gentle simmer with lid on.
When it is simmering, add 1 sliced clove garlic, another tablespoon of olive oil and a pinch of dried oregano with freshly cracked black pepper.
Simmer for 15 minutes, until pasta is cooked
al dente and the broccoli is soft.

Here you can see it is cooked.
Pour off some of the liquid but you want a little remaining in the bottom of your bowl.
Shave some parmesan cheese over the top,
a little cracked pepper and my favourite
chopped dried red chilli (optional of course).
Drizzle with a little extra virgin olive oil and serve.
This recipe serves 2 people generously.

The other serving was drained of liquid
and placed in a container for
my daughter's school lunch tomorrow.
This is why I used macaroni today!
We will add parmesan when it is cold
and possibly some fried bacon bits.


Simple but effective, a great lunch time offering in super quick time.
Buon appetito, if you enjoyed my post, please let me know.  Cheers Merryn :D 


Monday, 13 May 2013

Turkey Cannelloni

Cannelloni filled with Turkey


When I was 14 years old my best friend's parents decided to move over the border to Queensland.   We did so much together, from catching the bus to school to riding our horses every afternoon that were stabled in the same paddock.  Apart from being devastating it was also quite exciting.
We kept in touch often via phone calls or posted photographs and remained best friends.


 A few months later my mother dutifully put me on the Greyhound bus - at midnight of course - for the journey to visit my girlfriend in Queensland.   I was too excited to sleep - this was such a great adventure and I didn't want to miss a minute of it!   I noticed every bus stop and town along the way, all by streetlight.

The first day there we rode her horses and just enjoyed being together.
On the second day we were going to the newly opened Dreamworld.
I was full of anticipation and could hardly walk my legs were shaking so much.  That was the best day, a country girl riding high on the roller coaster and every fast moving ride on offer.
I have been back many times over the years, taking our children to experience all possible and they too have the love of the roller coaster and upside down rides.


The next day we went driving to Surfer's Paradise.  Strolling around the shops and examining everything in  Ripley's Believe it or Not.  Then we had lunch at a not so little Italian Trattoria which is where I first had Cannelloni.   It's funny how you assimilate food with life experiences, remembering intricate details about what and where you ate at different times.  I can picture the open air Trattoria on the corner and the aroma of that amazing cannelloni.


Turkey breast has 35 calories and 1 gram of fat per 1oz (28gram) 
serving which makes it a healthy non-vegetarian version.

It is super quick to make, is great heated up the next day and excellent to freeze for another time.


Turkey Cannelloni Recipe

Turkey filling:
500g lean turkey breast, minced
2 eggs, beaten
1 large onion, finely chopped
1 large clove garlic, finely chopped
1/2 cup fresh grated parmesan cheese
1/2 cup fresh Italian parsley, chopped
salt and pepper to taste

1 bottle Tomato passata, fresh basil leaves and grated mozzarella for topping.

1 x 250gram packet purchased cannelloni shells


Mix all of the turkey filling ingredients together, stirring until well combined.
Place olive oil in 2 large dishes just to coat the bottom.
Take each cannelloni shell and literally stuff the filling into half way with your fingers, then turn over and stuff from the other side.   Place slightly apart on the baking dish to allow tomato passata to drip between each shell.

Pour over the passata straight from the bottle until the shells are just covered.  Place whole fresh basil leaves randomly on top then cover it all with grated mozzarella.

Cover tray with foil and place in 180C oven for 30 minutes.
Remove foil and cook for another 10  minutes until mozzarella is nicely browned.  Remove and serve with a green salad and fresh bread to mop up any tomato juices.

This will make approximately 21 filled cannelloni shells.


This is my modern version of Cannelloni which I hope you enjoy.  You can make it also with half turkey/half pork combination.  I am working at improving my food photography skills but the flavour and aroma are undeniably sensational.

If you have enjoyed my post, kindly comment or recommend it to your friends.  Buon appetito Merryn.


Monday, 1 April 2013

Home made Sriracha

Stunning Sriracha made at home

Fermented Chilli Paste  


Sriracha is a very versatile, long lasting, hot and delicious fermented chilli paste.  
During the warmer months we have an abundance of chillies and after chilli jam, bottled whole chillies, dried hanging chillies and simply frozen chillies are processed, there is still an abundance of these gorgeous, fiery red chillies.


After reading The Hungry Tigress  http://hungrytigress.com/2012/10/fermented-sriracha/  post on Sriracha (pronunced 'see-ray-shah') I was inspired to make some of this delicious fermented chilli paste.
I weighed 650grams of freshly picked hot chillies for this recipe then washed and dried them.


After cutting off the stem and removing any soft chillies, I put them in the blender to chop them.


When they were processed finely, I added three cloves of minced fresh garlic and 2 tablespoons fine sea salt.


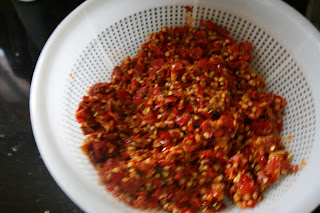
This is how they look at the start of the process.
Cover with plastic film, leave at room temperature and stir once or twice each day for 5 - 7 days.


After two days, they look a little more dull.


After four days, they appear less shiny.


At the end of seven days, at approximately 27 degrees Celcius each day, the Sriracha looks like this :-
and has a slightly sour smell.


At this time place the chillies into a sieve and extract as much liquid as possible from them by pushing down on the chillies to remove the juices that have been extracted.


 Then place chillies into a food processor with 1/4 cup white vinegar and 2 tablespoons of caster sugar.


Process until a paste forms and store in a sterilised jar in the refrigerator.
This paste will last for months and is useful for many purposes.  

Add Sriracha to mayonnaise for a tasty condiment.  
Use alone with barbecued grilled meats for a hot flavour burst.  
Mix a little with scrambled eggs before cooking.  
Use in marinades for chicken with soy sauce, garlic, shao hsing wine and sugar.
Mix with butter and freeze in a log shape to offer with grilled steaks.
Add to fried rice.
Use in place of sambal oelek in recipes.

The uses of Siracha are endless and you will appreciate a jar, or two of this in your kitchen, and at work, as well as in your mother's kitchen for when you are visiting.