Wednesday, 29 January 2014

Crab Fried Rice

Crab Fried Rice - My Unique Recipe


I have amazing days at work.  They can be incredibly hectic, talking to so many people, 
or quiet, gentle days when I can sit, read and reflect on things.
I prefer the busy days as they fly by and it is 4.30pm before you know it.
I pop into the supermarket on the way home to purchase the nights' dinner ingredients 
which ensures you always run into one or two friends which can be so entertaining.


This evening I bumped baskets with a very creative friend of mine.
This energetic friend throws everything in with anything to create a meal.
There were tins of crab for about $2 each where we were standing
so I bought a few, envisioning sang choy bau or crab + lettuce sandwiches.
Ms Creative said that she threw crab in with left over rice and vegetables.
I thought why not, but I would rather fry it.


Meanwhile Ms Creative and I walked together and were passing the fresh vegetable section when we
saw a man eating grapes.  Not just one, but he had a whole big bunch in his hand
and was standing there devouring it!  Seriously, I tried so hard not to look at him;
he was definitely not a local person - you just can't do that.
I did however leave the supermarket with a big smile on my face.


So a quick google search later revealed a few crab fried rice recipes,
which I glanced at before deciding to cook it my way.
This is what I came up with and cooked for lunch the next day - it was delicious!


Crab Fried Rice

2 cups cold cooked rice
150g cooked crab
1 egg
1 small onion, chopped
1 clove garlic, finely chopped
1 teaspoon curry powder 
1 tablespoon soy sauce
1 tablespoon fish sauce
white pepper and salt
vegetable oil
coriander leaves and a slice of lime for garnish

Heat up your wok, add oil and stir fry onion 2 minutes, add garlic and cook 1 more minute.
Toss in the rice and curry powder, cook 1 minute, add flaked crab and cook 1 more minute.
Move to the side and add the egg, slightly frying before folding through the rice mixture.
Add the soy and fish sauces, season with white pepper, taste before adding salt.
Slide onto a serving plate, garnish with coriander leaves and a slice of lime on the side.

Serves 1

Buon appetitio!  Enjoy, Merryn

Thursday, 23 January 2014

Eggnog Ice Cream

Delicious, dreamy and creamy.

It was Christmas time and the teenagers were begging for Eggnog.


In between peeling prawns and wrapping Christmas presents, we had to give eggnog a blast.
Then I remembered seeing this recipe in The Perfect Scoop by David Lebovitz.


I am so excited that our chickens are now all laying one egg each day ensuring we have a surplus of eggs.
Free range, organic and wholesome.


Planning to have friends over for dinner, I made a pavlova with 6 egg whites 
and pre-made this Eggnog Ice cream to chill in the refrigerator.


I also marinated the lamb and chicken in tandoori paste and yoghurt -
preparation is paramount to perfection.


See the lovely fresh bits of nutmeg.  Fresh nutmeg has an amazing flavour.


Here is BB pouring the eggnog mixture into the frozen ice cream churner.


Then we cooked our tandoori meat, made a huge green salad and a minted potato salad.
All while the ice cream churned and thickened.


Success!


Eggnog with delicious nutmeg bits, creamy, delicious and refreshing.
Shame I forgot about the pavlova in the oven when I turned it on to keep the plates warm.

Buon appeitito, Merryn

Eggnog Ice Cream

1 cup 200ml whole cream milk
2/3 cup (130g) white sugar
pinch of salt
2 cups (500ml) heavy cream
6 large egg yolks
1 teaspoon freshly grated nutmeg
2 tablespoons brandy
2 tablespoons dark rum
2 teaspoons vanilla extract

Warm the milk, sugar and salt in a medium saucepan.  Pour the cream into a large bowl and set a mesh strainer on the top.
In a separate medium bowl, whisk together the egg yolks.  Slowly pour the warm mixture into the egg yolks, whisking constantly, then scrape the warmed egg yolks back into the saucepan.
Stir the mixture constantly over medium heat with a heatproof spatula, scraping the bottom as you stir, until the mixture thickens and coats the spatula.  Pour the custard through the strainer and stir it into the cream to cool.  Mix in the nutmeg, brandy, rum and vanilla and stir until cool over an ice bath.
Chill the mixture thoroughly in the refrigerator.  Once the mixture is cold, taste it and grate in more fresh nutmeg if you wish.  Freeze in your ice cream maker according to the manufacturer's instructions.

Wednesday, 15 January 2014

Ratafia

It is sublime to garden, cook and have a refreshing tipple all at once.

This is just what Ratafia offers ......

Grow the peach tree, pick the leaves, leave them soaking in white wine for 10 days, strain, bottle and enjoy!
Preferably on a garden seat, enjoying the view of flora.


(1)  Pick 125 peach leaves, wash them and leave to dry.
(2)  Take 1.5 litres white wine (I used Moscato which is a sweet wine).
(3)  1 cinnamon stick, 1 star anise and 3 whole cloves.
(4)  Place all into a large jar, seal and leave at room temperature away from the sun, for 10 days.


(5)  After 10 days strain, you will see how golden the white wine has become.
(6)  Now very gently heat 1 cup Vodka with 120grams of castor sugar, stirring to dissolve the sugar.
(7)  Let cool and add to the strained wine.
(8)  Bottle into sterilised jars, seal and enjoy.
(9)  Store 1 bottle in the refrigerator and keep the other 2 on your liquer shelf.

(I do wish I had removed the bottle labels first.)

Ratafia


You have Ratafia!   A gorgeous digestif; perfect to have in a small glass over ice to finish your meal.
You can also mix 1/3 Ratafia with 2/3's sparkling water with ice for a refreshing drink.

Please note you must be over 18 in Australia to drink alcohol.
Merryns Menu suggests drinking in moderation.

Buon appetito!  Enjoy, Merryn

Thursday, 9 January 2014

Madagascar Bean Medley

We have a very full house at the moment.
MOH (My other half) plus two adults, two teenagers and my good self but I do love the busyness of it all.
I try to keep cooking light and simple over our Summer holiday, especially avoiding baking in a hot kitchen. 
This is an easy dish of Madagascar beans with spinach, garlic and chilli.


 The garden is flourishing, as are our Madagascar beans.
 I bought this plant from an online nursery not knowing how well  it would grow. 
It came as a 40cm high thin vine wrapped around an equally thin stake.


The Madagascar bean is at the front, there is definitely one central plant,
 but there would be more vines as it continually self seeds and grows.   
We planted it next to a 6 metre wooden stake, giving it room to grow.


The pods are plentiful, yielding one or two seeds each.  They are similar to a lima bean.


The seeds are also similar to borlotti beans with their maroon tinge of colour.

                                                                      To cook this Madagascar bean dish, soak the
beans in water for about 8 hours.
Then drain them and add fresh water then cook for approximately 45 minutes, until just soft.


Pour off the water and leave them to drain.

Wash and shred spinach leaves and chop garlic cloves.

Heat a little olive oil in a hot frying pan, add garlic then cook for 30 seconds.

Then add the spinach leaves and toss for 2 minutes, until the spinach is wilted.

Put the drained Madagascar beans in and toss for a futher 2 minutes, until heated through.

I added chopped fresh chilli for garnish but you can easily cook the chilli with the garlic, if preferred.

This gorgeous dish, created from our own bean bush,
when I cooked it the household was impatient that
it took longer to serve as I stopped to take photographs.

~~~~~~~~~~~~~~~~~~~~~~~~~~~~~~

Madagascar Beans with Spinach and Garlic
1.5 cups dried Madagascar beans (You could use borlotti, lima or cannellini beans instead)
Water to cover
3 spinach leaves, washed and shredded
2 small cloves of garlic, chopped
1/4 cup olive oil
salt and pepper
1 red chilli, seeds removed and chopped, for garnish

Soak the beans overnight in cold water,  then rinse and add fresh water.
Bring to a boil and simmer for 45 minutes, until soft.  Drain and reserve.
Heat a medium frying pan to medium-hot.  Add olive oil and cook garlic for 30 seconds.
Add spinach, tossing or stirring for 2 minutes.
Pour in beans and toss for another 2 minutes, until heated through.
Serve, with chopped chilli for garnish.

A great side dish for 6 people.
Or double this amount to serve with extra olive oil and crusty bread with a green side salad as the main meal.

How do you serve your side dish of beans?
Buon appetito!  Enjoy, cheers Merryn
Thursday, 2 January 2014

Garden Share Collective January Update

January ensures Summer is bursting with Sunshine Flavours

Plump pomegranates hanging with pride


Luscious eggplant (aubergine) delightfully rich.


Yellow eggplant, different in taste, but still delicious when fried or barbecued.


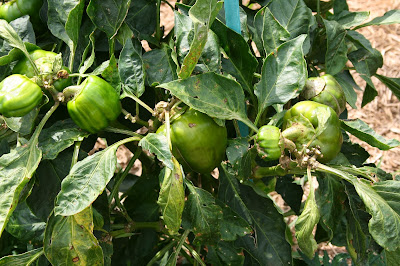
Wholesome capsicums, sweet and firm.
We let some turn red but they are so tasty when green ... why wait longer.


Look at these lovely shallots.  Some have developed white bulbs 
as they have been left too long in the ground. 
They do grow harmoniously with long stemmed grass.
You can pick the shallots out easily in between grass stems.
Some things just don't need as much weeding as others when you still reap results.


Beans, green beans, butter beans and snake beans.  A harmonious summer medley.

These snake beans are growing up a bamboo tripod.  
We have been picking them for two weeks now and they will continue to produce,
 including through self seeding until well into August.

-------------------------------------------------

The corn patch.  Our second plot of corn since Spring,
more seeds have been planted to ensure 
there is continual corn for the warm months. 


This is my messy herb patch.  
Lemon grass grows along with thyme, marjarom, chives, parsley, basil and oregano.
Garlic chives, baby spinach, celery, lemon thyme, 
marjoram, coriander and rogue tomatoes all grow side by side.
All within 10 metres of my kitchen, so handy, overgrown and cluttered, but still a cook's delight.


The blackberry and loganberry patch is loaded with fruit.  
We picked plenty of berries mid way through December, 
but are waiting for the next bunches to ripen.


This is a very mild chilli, 1 out of 10 on the heat scale,
 but perfect for flavour when you don't want heat.
We also grow jalapenos, cayenne peppers and serrano chillies.


Our rockmelon patch is constantly producing plump, ripe and sweet rockmelons.


 Here is my red papaya, flowering with the promise of papayas to come!


This is today's first picking.  
Eggs, snake beans, cucumber, shallot, tomatoes, corn and rockmelon.


Cabbages are still plentiful,
lightly cooked in salted water for 1 minute
and served with a satay sauce.
Finely sliced for coleslaw,
or pickled for sauerkraut.
Cabbage is a vegetable we grow 
and cook with every week of the year.


These are the highlights of my January garden,
I hope you have enjoyed viewing these delights.
Buon appetito, Merryn.