Tuesday, 30 April 2013

Preserved Chilli Peppers in Brine

Chilli Peppers in Brine

Peter Piper picked a peck of pickled peppers
A peck of pickled peppers Peter Piper picked.
If Peter Piper picked a peck of pickled peppers,
How many pickled peppers did Peter Piper pick?


I just love this nursery rhyme from childhood.  The beautiful alliteration is quite catchy and repeating the rhyme is enough to make you smile, a big happy smile :D

Funnily enough my parents ate quite bland food.  Fish or meat with 3 vegetables almost every night.
Both of my parents are steeped in English background.  My mother is a descendent of Matthew Everingham who was on the First Fleet, so I often joked to my friends that we were brought up on bread and water.

Actually, it was more like Sunday roasts with baked vegetables or freshly caught fish with oven baked chips and salad.  I vividly remember the first time I had garlic bread at a friends' house and marvelled at the amazing flavour.  Chilli, not very hot, was enjoyed at the same friends Italian family restaurant and had such an impact on me.

I was mesmerised!  These wonderful flavours had been hiding from me for all of my life.
Since then, my husband says that I am still making up for the lack of heat in my early years.  I love chilli.
I love garlic and chilli, together or apart.  If I have a sore throat the first thing I reach for is a spoonful of harissa or sriracha  to numb my throat and kill the germs (it certainly makes me feel better anyway).

Hence, we grow chillies, of many shapes, sizes and heat strength.
To eat, puree, cook, dry, freeze, give away, jam or to bottle.

This is an easy recipe for bottling whole chillies and I hope you too have the pure enjoyment of chilli peppers.


Leave the chillies whole, wash them and leave some stem on, about 1cm if possible.

Bring salted water to the boil and blanch the chillies in batches, for 1 minute, then remove, place in a colander and refresh with cold water.

Sterilise your jars by placing clean jars into a cold oven, turning the oven to 150 degrees celsius and when it has reached temperature., turn the oven off and let sit for 10 minutes.
Put the lids into a jug of boiling water and let sit 5 minutes, then carefully remove with tongs.

 Bring the vinegar to a simmer in a saucepan, adding the spices and stirring until the sugar is dissolved.


Take the sterilised jars from the oven with oven mitts, placing onto a tea towel on the bench so they don't crack on a cold surface.   Place the whole chilli peppers in the jar, then pour the brine solution over the top completely immersing the chillies in liquid.  You will find after 5 minutes that you need to add more brine as the air pockets in the chillies are filled with liquid.  Put the hot jar lids on and seal, label and let sit for 1 month before consuming.  This recipe will last for 2 years (if you don't eat them all first).

Pickled Chilli Peppers in Brine

600g fresh long chillies
2 tablespoons sugar
2 Tablespoons salt
1 Tablespoon black mustard seeds
10 black peppercorns
4 bay leaves
500ml cider vinegar
500ml white vinegar

Extra salt for boiling water


Rinse chillies, leaving them whole, then boil for 1 minute.  Remove and refresh in cold water.
Add all brine ingredients together and bring to a quick boil, stirring just until the sugar is dissolved.
Place chillies in hot sterilised jars, pour brine solution over until completely covered.
Seal and wait at least 1 month before consuming.
Buon appetito!


Homemade Crostoli

Making Crostoli - The Easy Way

Delicious Crostoli

I posted this previously on 'Bright Dinner Delights' but seeing as though Merryn's Menu is now my signature blog space, and Crostoli is such an important part of our life, I have transferred this updated recipe to here. 

Crostoli is a wonderfully light, fried Italian pastry.   Sprinkled generously with icing sugar - it really tastes as good as it looks. First introduced to Crostoli by my mother-in-law Mrs G who made it for special occasions, or to occupy a rainy day.  I have very fond memories of diantily nibbling on Crostoli whilst sipping an espresso, iced coffee or affogato with honeycomb with my extended family.

While it was often offered, and I was occasionally in residence when it was made I had never personally made this sweet treat.  When the good Mr and Mrs G first visited us in Sydney, after our second child was born I asked that now we had been married for twelve years, perhaps she would be kind enough to share her secret Crostoli recipe with me.  'Don't you have it?' she replied, almost sincerely,  'oh, but of course, here it is'.  I still have her treasured hand written recipe in my favourite Italian cook book.

View 1. Crostoli dusted with icing sugar
It is the wonderful family gatherings that make great memories and Crostoli is a big part of my in-laws food traditions.  Easter, Christmas, weekends, rainy days, birthdays or family gatherings always called for Crostoli.  It is enjoyable to make and purely delicious to enjoy.

When we visited last year, our parting gift was a big bag of crostoli which was almost entirely devoured on the first day.  Certain foods we relate to specific people and good food is always a blessing.
Crostoli is not hard to make, but definitely easier with a pasta roller than with a rolling pin - my first attempt! Attach your pasta roller to the kitchen counter top.  I use a little wooden wedge between the bottom of the benchtop and the tightened screw arm to prevent any damage to the underside of the counter top. 
View 2. Pasta roller attached to the kitchen bench
View 3. Place the flours and sugar into a large mixing bowl
View 4. Add the eggs, vegetable oil and brandy.  Add the grated zest of one lemon.
View 5.  Mix together by hand, then knead until you have a firm dough ball
At this time, if you have washing to hang out or something you really have to do, it is okay to cover and place in the refrigerator.  Simply bring out for 20 minutes prior to rolling.

View 6.  Starting with the largest setting, roll dough balls, the size of golf balls through the pasta machine
View 7. Place the sheets of rolled dough onto a lightly floured surface. It is quicker to run the whole batch through on the largest setting, then reduce the machine thickness by two twists and run them all through again
View 8.  Keep adding plain flour as needed to keep the dough supple and not sticking to your work surface.  When all dough strips have been rolled through the thinnest setting, it is ready to cut into strips.

These can be covered with a tea towel if not all rolled out in quick succession.
   
 View 9.  I use a fluted roller for a nice edge and twist 1 1/2 cm strips into rounds, bows or simply, strips
View 10.  Heat some vegetable oil, enough to deep fry in a large pan, fryer or wok to about 120 degrees celsius.  When you drop a bread cube in it should start sizzling gently,  immediately.
Gently drop in about 10 crostoli, fry for 1 minute then turn over and fry the underside for 30 seconds more
 When still pale but a light golden colour, remove with tongs and drain on kitchen paper.  The Crostoli will harden upon cooling.  If you are called away, cover the dough with a tea towel to keep moist.  When you have fried all of them, place some on a plate and sprinkle with sifted icing sugar.  Brew the coffee and enjoy!
 Only put icing sugar on servings as Crostoli will stay fresh in an air tight container for up to 2 weeks.

Mrs G's Crostoli

3 cups plain flour
2 cups self raising flour
1 cup sugar
6 large free-range eggs
1 small shot glass vegetable oil (50 ml)
1 small shot glass brandy (50 ml)
grated zest of 1 lemon
Mix flours and sugar together.  Add eggs, oil, brandy and lemon zest.  Mix to a soft dough and knead for 2 - 5 mins until pliable.   Divide into golf ball sized balls and flour your work surface.
Attach pasta maker to bench and turn to the thickest setting.  Run each small dough ball through and place on bench whilst you work on the next one.  Turn the pasta roller to the next setting and run each strip through again.  Keep flouring your bench.
Adjust the pasta maker to the next thinnest size and continue to run each strip through.  Cut the dough strips in half if getting too long to handle.  When they have gone through the thinnest, or even the second thinnest setting they are ready to be cut into strips.  Twist into bows, or loose round shapes or simply leave straight.
Heat vegetable oil for deep frying up to about 120 degrees, when a cube of bread dropped into the oil sizzles immediately then the oil is ready.  
Drop into the oil gently, 12 strips, fry for 1 minute then turn over and fry the other side for about 30 seconds or until a pale golden brown colour.  Remove with tongs and drain on paper towels.  Store in air tight containers when cool and serve dusted with icing sugar.

* For a variation, drizzle with honey and sprinkle with cinnamon instead of the icing sugar.
   Buon appetito!

Friday, 26 April 2013

Merryn's Peking Duck

Merryn's Peking Duck
My simple and delicious version


I am very lucky to have relatives on a dairy farm.  
Cattle, horses, chickens, pigs, lambs, dogs and ducks abound.
I love to walk in the green pastures, and hear the gentle moo of cows and neighs of horses.
It is relaxing and refreshing to meander on country time.


 The other day my Uncle kindly gave me a duck.  He has recently purchased a 'feather pluckier' to make his life easier.  You put the fresh duck that has been humanely killed into boiling water for one minute, place it into the feather pluckier and in quick time, the duck comes out featherless on one side while all feathers come out of the other side.
My Uncle is over 70 so you imagine how many hours he has spent plucking feathers from birds his entire life.
More astonishingly it never ceases to amaze me how many people have not yet tried Peking Duck.  


This could be put down to the expensive price restaurants command for this dish but it is relatively simple to cook at home.  Here is my easy recipe and after you try it, you will find it is delicious.

Firstly wash the duck then place in the sink and pour a jugful of boiling water over the top.

Place duck onto a plate and brush with a mixture of;
1/4 cup molasses with 2 Tblspns honey and 2 Tblspns boiling water mixed together.

After 5 minutes brush with the remaining mixture that has dripped onto the plate.

Wrap foil around the wings and legs to protect them from burning in the oven.


Pull the excess fat away from the cavity entrance, this is pure fat and can be burned down in a small saucepan. The pieces of fat will almost entirely dissolve and can then be strained to store in a jar in the refrigerator to roast tasty potatoes with later.


Stuff the cavity of the duck with three lemon slices, a cinnamon stick and two star anise.

Spray a roasting rack with olive oil to stop the duck sticking, place duck on top and put in a roasting tray filled with 1 cup water .

Bake at 180 degrees celsius for approximately        1 1/4 hours for 2.2kg duck. It will be browned and crispy all over after this time, but moist on the inside.


While the duck is roasting, make the pancakes.  Place flour, cornflour, eggs, butter, water and milk into a food processor and blend until combined.  Cover and stand for 20 minutes before using.


Heat a non stick shallow frying pan, a crepe pan if you have one, add 2 Tblspns butter and 1 Tblspn batter, swirling to cover pan, cook 1-2  minutes then turn and cook the other side for 1 minute until lightly brown.
Remove and store on a plate, repeat with batter, storing on top of each other, until they are all cooked.


(N.B.  If you are lucky enough to live near an Asian supermarket, you can buy frozen peking duck pancake wrappers and defrost before using or heat for 1 minute in the microwave in the opened plastic bag.)

We swapped the convenience of great shopping for a greener lifestyle and stock up on supplies and herbs from Asian supermarkets when in the city.  Our peking duck wrappers usually run out between city visits so I often make my own.

While the duck is still happily roasting away, you could turn it after 50 minutes if your oven is not fan forced to brown the underside.

Take 2 cucumbers; peel them, cut in half lengthwise and remove the seeds.  Then slice into 4cm long matchsticks, place in a serving bowl.

Wash and chop 8 green shallots into similar lengths and place in another serving bowl.

Place 1/2 cup hoisin sauce in a small serving bowl, mix with 1/2 tspn five spice powder and 2 Tbs soy sauce.


Place the duck onto a wooden serving board and rest for 10 minutes.

Slice the duck, placing the skin to one side so it can be finely chopped.  Shred the remaining duck meat.
You can also buy an excellent inexpensive Peking duck knife/cleaver from an Asian supermarket, designed specifically to slice the duck finely.  As you can see, Peking duck is a serious tradition :D


                       Take 1 pancake, 
                      spread a spoonful 
                  of hoisin sauce over top,            
              2 cucumbers and1 shallot slice, 
               then some duck meat and skin.  
                Roll up to enclose and enjoy!


Peking Duck Recipe

1 x 2.2kg muscovy or pekin duck

Basting Mix

1/4 cup molasses
2 Tblspns honey
2 Tblspns boiling water
Mix together and baste over top of duck until it is dry.  You can use a hair dryer to speed up the process.

Cavity Flavourings

3 slices lemon
1 cinnamon stick
2 star anise

Peking Duck Pancakes

1 cup plain flour
4 Tablespoons cornflour
1/2 cup tepid water
1/2 cup milk
4 eggs
2 Tablespoons butter, melted
Blend together in a food processor.  Cover and stand 20 minutes then cook 1 Tblspn batter as for crepes.

Extras

2 green cucumbers, sliced into 4 -5 cm lengths
6 - 8 green shallots, sliced into 4 - 5cm lengths
1/2 cup hoisin sauce
(Optional, you can add 1/2 teaspoon five spice powder and 2 Tablespoons soy sauce to hoisin sauce)

This recipe will serve 5 people, a 2.5kg duck will serve 6.
Please, if you like my recipe, try it and let me know if you found it easy and divinely delicious.


Tuesday, 23 April 2013

Preserving Lemongrass in Brine

Lemongrass, fresh and sweetly scented

Perfect for Stir fries, Curries and Jam.

Preserving Lemongrass

Where I live in the mid north coast of New South Wales lemon grass is a constant. 
It grows all year round, healthily and in abundance.  
Like a good extended family, it expands, grows and multiplies.  

 I notice our gorgeous Himalayan cat Chloe loves to chew the sharp grass edges, cleaning her teeth with a citrus flavour.  Lemongrass does have a unique scent which is appealing to animals as well as to us.


While we are lucky to have it growing abundantly, it can be handy at times, especially when you have limited time to prepare dinner, to have a jar of lemongrass already chopped in the fridge.

This is a simple and effective way to preserve the lemongrass.

Remove the green stems and only keep the white part of the lemongrass as this contains all of the flavour.
Roughly chop into 3cm lengths.


Then place into a food processor or blender and blend until finely chopped.


Place the lemongrass into a sterilised jar whilst the jar is still hot.
(To sterilise a jar place in the oven when cold and heat oven to 150 celsius, turn off and let sit 10 minutes.)


Make a brine with1 cup boiling water, 1 tablespoon salt and 1 teaspoon of sugar.
Mix all together and pour over the lemongrass making sure it is all covered with the liquid.


Seal, cool, then store in the fridge until required.


Use in curries, stir fries or savoury jams as required.

Buon appetito, please let me know if you found this post useful.  Cheers Merryn

Tuesday, 2 April 2013

Peach and Apple Jam

Divine Homemade Peach and Apple Jam

With summer warmth comes the arrival of apples.  I always thought apples were a cold climate fruit as Tasmania is called 'The Apple Isle' and apple trees are not prevalent in the mid north coast of New South Wales. 
MOH (My Other Half) protected the green Granny Smith and the dwarf Pinkabelle tree from invading apple eaters.  Late last year we were so excited to see the Royal Gala and Golden Dorset apple trees growing side by side bloom firstly with gorgeous pink/white blossoms which were then replaced with small apples that slowly but surely grew to be gorgeous, edible apples.

These apples were close to being harvested in late November when we went away for a few days.
On our return we were devastated to see the apples had been seriously culled, some hanging half eaten off the trees.  Thinking they were birds, MOH netted the tree and that evening, just after dark, you could hear creatures settling on the tree and getting trapped in the net.  They were flying foxes!  Much like a bat, there were 5 flying foxes caught in the net and the night was still young.  Needless to say it was not easy disentangling these hapless creatures and we realised we would not be eating any of those apples.

Thus when the other two apple trees, the Granny Smith and Pinkabelle (which is basically a dwarf Pink Lady tree) were slowly ripening, MOH constructed a PVC plastic pipe structure and netted it on the sides so it could be moved from one fruit laden tree to another.  Very creative and we managed to harvest 6kg of apples which was brilliant considering the trees have been in the ground 1 -2 years and this was their first fruiting.


We have had apple pie, apple danish, apple crumble, bakewell tart, apple sauce, and fresh apples but there was still some remaining so my thoughts turned to jam.

I had previously made fig and apple jam at Christmas so this time decided on purchasing some beautifully big, juicy yellow peaches to combine with the apples.

Firstly I measured 1.8kg green apples, washed them which was probably not necessary as using the clever apple slinky the apples are simultaneously cored and peeled in one movement.  I know there were no pesticides used in the manufacture of these apples, but washing fruit is purely a learned habit.  Then they were chopped to a small 'suitable for jam' size.


The gorgeous peaches were plunged into boiling water for one minute then refreshed in cold water to enable the skins to be peeled easily.   Then the peach stones were removed but reserved for special use.


The peaches were similarly chopped to the same size as the apples.


The chopped apples were simmered alone initially prior to adding the chopped peaches and lemon juice.


I placed the apple cores and peach stones into a square of muslin, then tied the ends together and hung this into the chopped apples.  There is pectin in the cores/seeds which helps the jam to 'set'.


Removing the muslin bag before adding the sugar.


Simmering away with the sugar added to the jam.  After the sugar is dissolved, don't stir the jam again.


Peach and Apple Jam Recipe

1.8 kg fresh green apples, cored, peeled and finely chopped
10 large peaches, skinned and stone removed
250ml water (1 cup)
250ml lemon juice
1.2kg sugar, approximately
muslin to store the apple cores and peach stones in during cooking.

Place chopped apples and water in a large saucepan, bring to boil, reduce heat to simmer and allow the tied muslin bag with the apple cores and peach seeds to nestle in the fruit, then simmer covered for 10 minutes. Add the chopped peaches and lemon juice, then simmer for approximately 20 minutes, or until the fruit is soft.    Remove the muslin bag, squeeze to remove any liquid and discard.
At this stage it is suggested by many jam makers, including my mother, that you measure the jam and add 3/4 cup of sugar for each full cup of jam.    I find this an unnecessary step and as we don't like our jam too sweet I added 1.2kg white sugar which was just perfect.  Sugar can be added to taste.
Boil uncovered for a further 10 minutes, do not stir after the sugar has dissolved.  Jam is ready when a little placed on a saucer that has been in the freezer 'sets', that is, forms wrinkles when pushed with your finger.
Pour hot jam into hot sterilised jars and seal while hot.

This jam will last for a long time, about two years, but I suspect strongly that the family will eat all the jars before we can do a time test.
Buon appetito!

Monday, 1 April 2013

Anniversary Cake and Cupcakes


Happy 50th Wedding Anniversary to Moyna and Gordon.

 It was my parents 50th wedding anniversary on 30 March 2013.
It is an amazing accomplishment and one which must be sincerely congratulated.


Here are the accompanying celebratory cupcakes.


Here is the happy couple pictured on the left.


The lady in the middle is my Aunt Dawn, who created this amazing anniversary cake;
with Uncle Terry seated to her left.  I wanted to record her creativity and huge ability.
Cake decorating is inspiring and time consuming.
What a wonderful family day was shared by all.

Home made Sriracha

Stunning Sriracha made at home

Fermented Chilli Paste  


Sriracha is a very versatile, long lasting, hot and delicious fermented chilli paste.  
During the warmer months we have an abundance of chillies and after chilli jam, bottled whole chillies, dried hanging chillies and simply frozen chillies are processed, there is still an abundance of these gorgeous, fiery red chillies.


After reading The Hungry Tigress  http://hungrytigress.com/2012/10/fermented-sriracha/  post on Sriracha (pronunced 'see-ray-shah') I was inspired to make some of this delicious fermented chilli paste.
I weighed 650grams of freshly picked hot chillies for this recipe then washed and dried them.


After cutting off the stem and removing any soft chillies, I put them in the blender to chop them.


When they were processed finely, I added three cloves of minced fresh garlic and 2 tablespoons fine sea salt.


This is how they look at the start of the process.
Cover with plastic film, leave at room temperature and stir once or twice each day for 5 - 7 days.


After two days, they look a little more dull.


After four days, they appear less shiny.


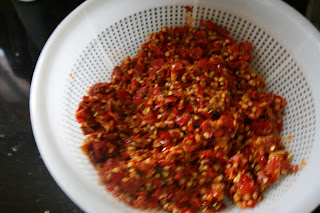
At the end of seven days, at approximately 27 degrees Celcius each day, the Sriracha looks like this :-
and has a slightly sour smell.


At this time place the chillies into a sieve and extract as much liquid as possible from them by pushing down on the chillies to remove the juices that have been extracted.


 Then place chillies into a food processor with 1/4 cup white vinegar and 2 tablespoons of caster sugar.


Process until a paste forms and store in a sterilised jar in the refrigerator.
This paste will last for months and is useful for many purposes.  

Add Sriracha to mayonnaise for a tasty condiment.  
Use alone with barbecued grilled meats for a hot flavour burst.  
Mix a little with scrambled eggs before cooking.  
Use in marinades for chicken with soy sauce, garlic, shao hsing wine and sugar.
Mix with butter and freeze in a log shape to offer with grilled steaks.
Add to fried rice.
Use in place of sambal oelek in recipes.

The uses of Siracha are endless and you will appreciate a jar, or two of this in your kitchen, and at work, as well as in your mother's kitchen for when you are visiting.